Tuesday, November 28, 2017

Deflecto Designer Spotlight for November 2017


Congratulations to the Deflecto Designers whose blog posts have been chosen for the
month of November. Check out their projects and instructions on the links given below!


Alexandra Stapleton-Smith project:


Jessica Litman project:


Marilyn Gossett's project:


Rosie Nunjai project:


Make sure to follow us on Facebook and Pinterest for all of our design teams inspiration.

Friday, November 24, 2017

Christmas Gift Card Holder.


Howdy, everyone! It's Anita here today to share a fun project with you. Since my kids are all grown, we tend to give a lot of gift cards at Christmas time. I love to find new ways to present the gift cards and this year I am using the Deflecto Flexible pouches. They are so very easy to decorate, and they turn out super cute!


Deflecto Flexible Pouches come in two sizes, and they are great for all kinds of projects! I used the smaller size for this gift card holder. These pouches are also great for storing paint samples and color combos; they are super handy to carry in your purse when you are shopping. You can also use the large size pouches to create a mini album - check it out here.


I started by covering both sides of the pouch with patterned paper. I used the new Milk and Cookies line from Doodlebug Designs. It is so cute! On the back side of the pouch where the plastic overlaps, I adhered a smaller piece of paper to slip inside.


I adorned the front of the pouch with more paper from the Milk and Cookies line. I love to add faux stitching to my projects - it just adds so much visual depth to a piece! I layered die cut stickers, paper accents, and some amazingly cute Shape Sprinkles to embellish this side. My last step was to outline the sticker shape with a thin black pen - it just makes the shape pop off the page. I am in LOVE with the Stabilo Point 88 Thin Line pens. Those things are amazing an give the best thin line!


On the reverse side I added more paper accents. The sentiment is created with Joy Embroidered Letters. These two colors were perfect for this paper line, and this font is so fun and playful. I cut a matching piece of cardstock to fit inside the pouch and adhered the gift card using temporary tape. Punch a hole at the end of the cardstock and tie on lots of ribbons to finish it off.


Who wouldn't love to get this super cute Gift Card Holder? I am pretty sure there are going to be a few of them floating around the tree on Christmas morning here at our house. To see more great ideas using Deflecto Products be sure to check out our Pinterest page and Facebook!

Tuesday, November 21, 2017

Organizing My Crafty Life With Deflecto Magnetic Sheets

Hello everyone! As you probably know I love to craft. I have been doing it for many years and for that reason I have accumulated so many metal thin dies. When I received my generous November DT package from Deflecto and saw these big magnetic sheets, I could not think of a better way to use them than to organize my dies in my craft room.
You can do so many things with these magnetic sheets. They can be: 
Painted or papered 
Cuts easily with scissors, craft knife, punches and a variety of cutting machines 
Magnetically attaches to metal surfaces 
They are 8" x 15" so they are big pieces and of course I chose to cut them down with my guillotine to fit my plastic sleeves for storage.

I also used my scissors to make some additional cuts.


They are perfect to hold your dies. The craft magnetic sheets come in a 
pack of 10 sheets and are very strong and durable.


I have started organizing them and still have quite a few to do but I'm loving the outcome.


Here is a peak of my craft room, as you can see I have a lot of work to do.


I will have to get plenty of these Craft Magnetic Sheet-10-Pack to finish my organization. I am sure they will make your crafty life much easier. 
Thanks so much for stopping by and I hope to see you around. 

Rosie

Friday, November 17, 2017

Time to Bake and Organize!

Hi Everyone!

Alexandra here again from Hedgehog Hollow with a great organization idea for you. I don't know about you but it's the time of year when I start baking again. It never seems on the summer agenda, it's too hot to have the oven on, the kids are off school and so who's going to eat it all?! However, this year I started pulling out all my boxes from the shipment that haven't been touched and say baking; well you can imagine the state of them! So I started searching for organization ideas. When my Deflecto box for the month arrived I knew they have the perfect solution! Roll in the Carousel Rotating Organizer!! It comes in a 6 or 9 bin options (links below); I have the 6 but have an order in for the 9. I am organizing by type and holiday. This carousel is full of my Wilton flower fondant cutters and my special German cookie cutters, plus Maddi's cookie stamp...


Deflecto provided me with some product to create this project. The opinions I share are solely my own.
This is such a fab idea, here are a few more sides... 


Plus the bottom piece rotates so it's easy to find what you are looking for and there's a set of guides that keep each slice in place, plus you can nest more canisters on top (Check out that motions blur too 😉)...


I labeled each canister with my P-Touch (linked above) and I intend to then switch out the canisters in my pantry for the appropriate season and have my endless supply of other cutters in my laundry cupboard where all my cake pans live. I also love how easy they are to clean if I get sticky fingers on them while baking! Win win!! Thanks so much for joining me today for a storage post. 

Happy Baking!

Tuesday, November 14, 2017

Bead Organizer For Kids

I work with a lot of clients as a professional organizer. One thing that always is a struggle is organizing beads for necklaces, bracelets, and other art activities. The cases for the beads is never optimal for functional storage. Plus, when little fingers get a hold of those beads, it could easily be a disaster!

So I created a bead-making station for a client using the Carousel Rotating Organizer with 6 bins!
 

 Bead Organizer For Kids


Materials 


Tutorial


Step 1:

Adhere decorative Washi tape around each of the 6 bins of the Carousel Rotating Organizer. I used black and white Washi tape, along with the glittery tape.

Step 2:

Write what type of bead will go in each of the 6 bins using the Sharpie Oil-Based pen. Don't worry about messing up because you can just use nail polish remover to write off the Sharpie!

Step 3:

Fill bins with different beads.

Step 4:

Teach the kids how to use the bead organizer!


I just love how pretty this organizer looks filled with beads and decorated with Washi tape and labeled! If you know anything about me, I love a good label! They help keep everything organized and easy to find.

Tuesday, November 7, 2017

How to use Deflecto's Craft Magnetic Sheets

Hello, everyone!!  Kymona from Kreative Kymona here today to show you how to use Deflecto's Craft Magnetic Sheets.

What are Deflecto's Craft Magnetic Sheets?

Deflecto's Craft Magnetic Sheets are:
- White
- 8" x 15" in size
- Can be painted or papered
- They cut super easy with scissors, a craft knife,
punches and a variety of cutting machines.
-  They come in a pack of 3 or 10 sheets.

Let's Take a Look:

Now Let's Take a Look at What You Can Create:


Here's How I Created This Tray:

I collected all the supplies that I needed to create this tray:

Warm and Cozy Pattern Paper
Craft Fantastic Glass pieces
Tombow Tape Runner
Wilson Cookie Sheet


To start, measure the cookie sheet so that the pattern paper can be cut to that size.


Cut the pattern paper and the magnetic sheet to 12 x 7.


Add adhesive to the back of the pattern paper using  Tombow Permanent Adhesive Plus.  Once that is done, adhere the paper onto the magnetic sheet.


Once that is done, adhere the paper onto the magnetic sheet.


Place the large mat inside the tray.

Once that is done, create sentiment magnetics and place them on the tray.


For the magnetic notepad holder, use a Deflecto VersaGrip Magnetic Sign Holder. Take your time and pull the long metal pieces out and clip the clip to the magnetic base.


Glass magnets can be created using the magnetic craft sheets.


Nice and easy!!

Let's take another look:


So what do you think? Would you create a magnetic tray for your home or office? I would love to hear from you.

 Thanks for stopping by, I hope you were inspired here today.

~Kymona

Make sure to follow us on PinterestFacebook, and Instagram for more inspiration!
Don't forget you can purchase the Stackable Caddy HERE at Target.

Friday, November 3, 2017

Carousel Pumpkin Decor with Deflecto

November is upon us! The month to celebrate our many blessings with friends and family. Deflecto provides us with many products to help us with our celebrations and feasts. I used a Rotating Carousel Organizer to make a useful piece of decor to celebrate the season. Read on and I will show you how!

You will need:

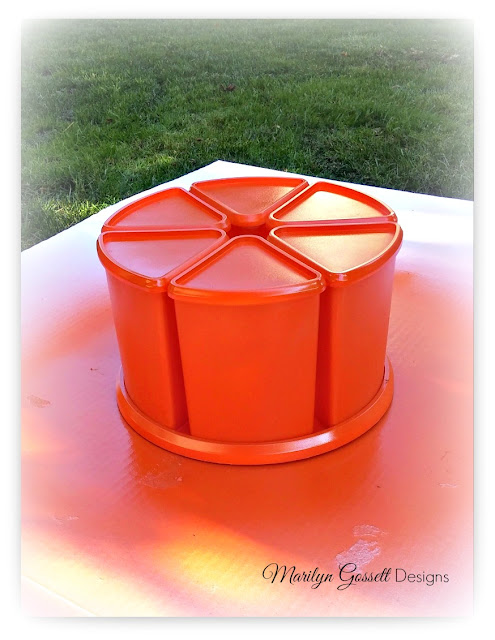
Deflecto: Rotating Carousel Organizer #3900CR 6 canisters

Spray Paint: Krylon Fusion for Plastic, Orange

Cinnamon Sticks

Cardstock: Green, Orange, Dk. Yellow

Inkpads: Orange, Green, Brown

Wedge Sponges

Raffia

Craft Glue

Scissors

Die cut machine for cutting leaves

Instructions:

1. Follow the instructions given on the paint can and paint the canisters, lids, and base.

Allow to dry thoroughly.


2. Cut the leaves. Ink the edges. Apply craft glue to the wrong side of the leaf and adhere to the front of one canister. Repeat for the other canisters.


3. Gather a bunch of the cinnamon sticks and secure with raffia. Tie a knot to secure. Trim raffia ends. Place the cinnamon sticks in the top opening of the canisters. Adhere the leaves to the cinnamon sticks and raffia as shown. Take care to not get glue on the canister.


Here is the completed canister. I used Deflecto mini sign holders to make the scarecrow and the crow. The legs and arms are Deflecto Sign Danglers.

Hope you have a wonderful month of November! Onward and forward to December! We will have much more to show you for Christmas! Thank you for coming by! We welcome comments and questions.
Related Posts Plugin for WordPress, Blogger...