Sunday, June 26, 2016

Designer Spotlight for June 2016

Every month deflecto spotlights some of the stand-out designs by the deflecto ambassador design team. Congratulations, Marilyn, Lorrie, Nadine and Sue for your original and creative designs!


Check out our designers' blog posts to find designs and instructions:


wedding table markers marilyn gossett

Make sure to follow Deflecto Crafts on Pinterest and Facebook for more inspiration!
Happy Crafting!

Saturday, June 25, 2016

Deflecto's Black Border Frame

Hello, friends! I know you don't see too many glitter frames for men, but I put this frame on my desk, so I had to add glitter. I used Deflecto's Black Border 5" x 7" Frame and added a single layer of silver glitter washi tape. I love these frames. They are easy to add and remove pictures. You slide the picture in on the side of the frame. You don't have to remove any screws or anything, and you can decorate them in so many different ways.


Once I added the glitter washi tape to the front of the frame. I then added a picture of my husband in his uniform.

Products Used:
  • Deflecto Black Craft Frame 5x7
  • Scotch Washi Tape Silver Glitter 
  • Your Favorite Picture

I hoped you enjoyed my post today. Have a wonderful day!

Larissa Pittman

Make sure to follow Deflecto Crafts on Pinterest and Facebook for more inspiration!

Friday, June 24, 2016

Build a Treat Station with Deflecto Stackable Storage!

Storage is fun for the obvious things, right? I decided to up the fun factor by putting together this DIY Candy, Gum and Nut treat station. This is perfect for any party, get together, or as home decor. It will be perfect in my design studio to provide treats for my guests. We always get hungry when we are creating!
You will need:

Deflecto: interlocking stackable storage (4 bins in unit)
Acetate scrapbook paper: I used four different designs of 8-1/2" x 11" papers
Americana Acrylic Paint by DecoArt: Sea Aqua (to match the papers)
Wooden Ball Knobs: two 1-1/4"
Mod Podge: Dimensional Magic by Plaid (for gluing)
Glitter cardstock: 12" x 12" gold
Die cutting machine (Cricut) to cut letters
Paper trimmer
Ruler
Paintbrush, two 1/4" dowels (for paint handles)
Adhesive tape runnerYou will need:

Here is the finished project! Next, I will tell you how I did it.
1. For each drawer: Use the ruler to measure the height and width of the front of one bin drawer. Cut the acetate to fit; apply small dots of adhesive to the right side of the acetate, top and bottom. Adhere to the inside of the bin drawer. Cut a contrasting paper to fit the inside of the back of the drawer. I used an acetate with a cursive design on it. This is just to add a little dimension. Repeat for all four drawers. Cut extra pieces of acetate to further decorate the top and sides of the unit if desired.

2. Die cut the letters from the glitter cardstock. My largest letters are 1-1/2" The smallest are 3/4". Make sure all of the cut letters fit on the bin drawer before you glue them down. You will adhere them directly to the acrylic bin drawer as shown. Use the Mod Podge dimensional magic as the adhesive for adhering the letters. Apply small dots of adhesive to the acetate paper to adhere each piece to the acrylic.


3. This is what the wooden knobs look like before you paint them. Make sure you like the way they look on your treat station. Some may prefer to leave it plain.

4. Insert one end of the wooden dowel (or chopstick) into the pre-drilled hole of the ball knob. Paint each knob and let dry thoroughly.

5. Adhere the knobs to the top of the treat unit as shown using a dab of the dimensional magic adhesive for each.
There you have it!  You can attach your bins to each other as shown in the photo above, or keep them separate to place around your event or home.  How you decorate your storage bins is up to you.  The possibilities are endless!

Visit deflecto crafts Solutions at http://www.deflecto.com/craft/

I hope you got some inspiration here today.  I love getting comments and questions.  You can leave one below!

Make sure to enjoy the little blessings along the way and,
Live Life with a Flourish!

Marilyn

Make sure to follow Deflecto Crafts on Pinterest and Facebook for more inspiration!

Wednesday, June 22, 2016

Pin Minder, Summer Sewing with Deflecto

Hello! Jennifer here from BeStillMyCraftingHeart. I have been itching to share this project for quite some time. I use pins every day and thought this would be a fun project for my summer sewing students. A magnet, for a quick grab of a pin, while the cushion is cute and will help organize the pins for their next use.


All you will need is the Deflecto Mini Slanted Sign Holder, 3"x4", Deflecto Craft Magnetic Sheet a scrap of fabric, elastic and a little fluff and you will quickly have a cute Pin Minder.

For all the details and how-tos stop on by Jennifer's blog to create your own Pin Minder.

Make sure to follow Deflecto Crafts on Pinterest and Facebook for more inspiration!

Monday, June 20, 2016

Got Cupcakes? We've Got the Perfect Display Solution!

Planning a party this summer? Our 3 tier dessert stand is a great way to help display your tasty party treats! Check out this video by Craft Box Girls sharing some creative ways to use them.


Make sure to follow Deflecto Crafts on Pinterest and Facebook for more inspiration!

Friday, June 17, 2016

A "perfect-o" Deflecto DIY wedding!

Weddings are a joyous occasion! Here is another DIY project I have been busy working on for my daughter's wedding this summer.

joy embroidered letters wedding table marker

I have completed the table marker project with this beautiful sign that will sit at the head table with the bride and groom.
  • Deflecto 12"x12" acrylic sign holder 
  • To create this sign you will need the following:
  • Joy embroidered letters, spelling Mr. and Mrs. with the last name 
  • Cardstock - black/white stripe, plus solid black, teal, green 
  • Gold glitter cardstock 
  • Pearl beads, star embellishment 
  • Paper trimmer, scissors, adhesive 
  • Self-adhesive faux rhinestone trim 
  • Die-cutting machine with die-cut for scalloped ovals 
  • Paper flowers
Instructions:

To make hand-rolled paper flowers, cut cardstock into various sized circles 2" - 4" in diameter - they don't have to be perfect. Cut each circle into a 3/8" spiral. Leave a little circle in the middle. Roll the spiral into the form of a rose. Use a hot glue gun to secure the rolled spiral at the bottom. I use my fingers and thumbnail to distress the edges of the rose.
Cut out leaves by hand or with a die-cutting machine. If you cut out a heart from a folded sheet, then cut the heart in half along the fold, so you can easily shape each half into a leaf.
Cut the striped cardstock to fit the size of the acrylic sign holder, then trim black and teal sheets to fit behind the couple's last name. Layer and adhere these background papers together and slide into the sign holder.

Die-cut a pair of scalloped ovals from cardstock (larger black and smaller gold glitter) for each letter. Glue to the outside of the sign holder, then center and adhere each letter on top as shown. Embellish your table marker with the flowers, leaves and rhinestone trim. Glue a pearl into the center of each flower.

Spell your name in Joy letters, available at your local craft store!

Thank you for stopping by, I hope you got some inspiration here today! Make sure to take time to enjoy the small blessings along the way and,

Live Life with a Flourish!

Make sure to follow Deflecto Crafts on Pinterest and Facebook for more inspiration!

Thursday, June 16, 2016

Father's Day Frame

Dad doesn't need another tie -- give him a DIY gift instead!

Show Dad how much he is loved with this fun frame from Deflecto! This masculine-themed frame will be an awesome addition to Dad's desk.


I used the 5" x 7" Black Border Craft Frame as the base for my project. I then decorated the frame using patterned paper and embellishments from Photo Play Paper's "This Guy" collection.
Directions:
1. Cut 4 8"x6" strips of patterned paper. Attach directly to the frame in the black border area.
2. Cut a 5"x7" piece of coordinating cardstock, then attach a 4.5"x6.5" piece of black cardstock to it. Place these inside the frame.
3. Cut one of the 3"x4" cards from the "Keep It Handsome" card sheet and attach to the front of the frame (not on the paper in the frame).
4. Finish with matching stickers and embellishments from the sticker sheet and ephemera pack! I used foam dots under mine to give additional depth to the project.

Looking for more inspiration? Follow us on Pinterest and Facebook.

Wednesday, June 15, 2016

Happy Summer Frame

I’m really starting to love this new summer schedule. Everything seems a little more laid back, and I feel like I’m getting lazier by the minute. But honestly, I’ve been busier this week than I have in a while. This week has been full of gardening, cooking out, a couple of  really cold dips in the pool, movies, shopping, a softball game and to end out the week, dance recitals, and a retirement party.
And… I don’t want to miss a thing!


Summertime is Memories just waiting to happen!


This Happy Summer Frame was made using a 4" x 6" clear acrylic frame from Deflecto Crafts and papers, stickers and embellishments from Echo Park's Happy Summer Collection.


Make sure to follow Deflecto Crafts on Pinterest and Facebook for more inspiration!


For More From Sue Eldred visit her blog Sue's Creative Workshop.


Tuesday, June 14, 2016

Father's Day Gift Ideas

Looking for some great ideas for Father's Day? Check out these two frames that our designers using our Magnetic 6" x 4" Curved Frame.


 "Modern Classic" by Lorrie McCullers


Need more inspiration? Follow us on Pinterest and Facebook.

Monday, June 13, 2016

DIY Wedding Decorator At Your Service!

My daughter has a wedding coming this summer, and I get to be the DIY wedding decorator, and I am so excited! She has chosen her colors and now I get to put my hand to the task of creating table decorations and more!wedding table markers marilyn gossett

For the table markers, I decorated the Deflecto 3" x 4" mini sign holders 
With the following supplies:
Joy embroidered numbers
Cardstock - teal, black, black/ivory stripes, gold glitter, turquoise glitter
Rhinestone trim
Pearl embellishments
Adhesives, scissors, paper trimmer, glue gun

Instructions:

To make one of the flowers, cut the teal cardstock (12"x12") into nine equal squares. Cut off the four corners of one square making it round - it doesn't have to be perfect. Cut it into a spiral shape, about 3/8" thick. Leave a little circle in the middle. Roll the spiral into the form of a rose. Adhere the circle on the bottom to the rest of the flower to secure. A glue gun works best for this step, especially if you have multiple flowers to secure. I use my fingers and thumbnail to distress the edges of the rose. Repeat for each flower. Cut smaller squares of cardstock for smaller roses.

Cut out leaves by hand or with a die-cutting machine. If you cut out a heart and cut it in two; you can more easily shape each half into a leaf. Add the leaves after gluing the flowers to the frame.

To frame each table number, cut mattes from the cardstock as follows:

Stripe/teal: 3" x 4"

Gold: 2" x 2-1/2"

Black: 2-1/8" x 2-3/8"

Center and adhere the gold paper to the slightly larger black paper. Center and adhere to the background paper 1/2" up from the bottom edge. Insert into the frame.

Embellish the outside of the frame with the faux rhinestone trim, flowers, and leaves. Glue one pearl into the center of each rose.

Remove the backing from each number; center and adhere to each frame as shown in the photo given.

We have lots to do, and this is just the beginning, you'll see more of my wedding projects in more blog posts coming soon....

Thanks for taking the time to stop by today. I hope you got some inspiration for your next event.

Make sure to take time to enjoy the small blessings along the way and,

Live Life with a Flourish!


Make sure to follow Deflecto Crafts on Pinterest and Facebook for more inspiration!

Wednesday, June 8, 2016

Wedding Collage Frame

We are past our rainy season and the beginning of summer, which is a perfect time for outside celebrations and weddings. DIY wedding gifts make great keepsakes and are something that will be treasured for a lifetime!


I put together this wedding collage using various ephemera from Tim Holtz and printables from VectoriaDesigns. To add to the wedding theme, I decorated the frame with pearls and a lace ribbon.
Craft Frame5"x7" - Black
Make sure to follow Deflecto Crafts on Pinterest and Facebook for more inspiration!

Thanks for stopping by!

Tuesday, June 7, 2016

Deflecto Cube Storage for Parties and Events

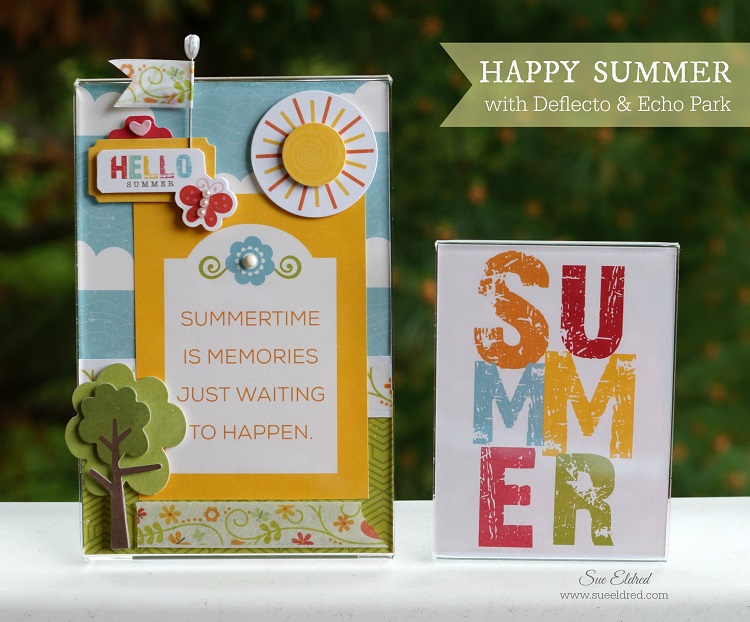
WELCOME SPRING!  There is a reason to celebrate almost every month of the year, and Deflecto has just the products for you to put on a successful event!  The cube storage that I am featuring on my blog today can be used for craft storage or a party/event table!  I am showing some ideas for the party table. There so many looks you can achieve.


Stackable Cube Organizer - "X" Divider pictured above.

For the bin pictured above you will need the following supplies:

Deflecto:  x cube storage; Sign Tag with wet erase white chalk pen
washi tape to match your project
jute string
button embellishments
adhesives
stamped sentiment (optional)
12" x 12" cardstock sheet (your choice of colors and print)


4-drawer stackable cube organizer pictured above.


Sign Tag with wet erase markers.


What do I need to decorate the cubes for a party or event?  

For each cube, you will need to cut a 12 x 12" cardstock sheet into four 6" squares.  Trim any excess and fit around all sides except for the bottom.

Adhere the squares together at the seams using Washi tape.

Embellish the outside of each drawer.  I layered scalloped circles and glued a button on to finish it.

Inside of drawers, cut a strip of paper to fit the bottom of one drawer.  Insert.  Repeat for the remaining drawers.

Fill the drawers with candy or other little goodies.  Bubblegum balls in theme colors look cute in the drawers.

I hope you got some inspiration from the blog post today.  Check out all of our design team posts!


Make sure to follow Deflecto Crafts on Pinterest and Facebook for more inspiration.

Live Life with a Flourish!

Marilyn

Monday, June 6, 2016

Interlocking Tilt Bin Storage for Chalk Inks

My chalk inks are now super easy to find and to organize thanks to the Deflecto Interlocking Single Tilt Bin - 4 pack! Each ink type has it's own space and it makes to easy to bring to my desk to find what I need.


Check out my video to see all the amazing things this little tilt storage unit can do and where I store my inks!!


Here is how the tilt bins open, and you can pull it out to bring to your workspace for easy use.

Make sure to follow Deflecto Crafts on Pinterest and Facebook for more inspiration!

Saturday, June 4, 2016

Quick and Easy DIY Wedding Frame

Hello, everyone! Nadine here today and June is the month for weddings! Do you have a wedding to go to this month and still need a gift? How about making a gorgeous frame that is actually really easy to make? All you need is a 5 x 7 Black Border Frame by Deflecto and few other supplies.


Watch the video here to see how easy it was to create...


Here are a few close up photos....


Make sure to follow Deflecto Crafts on Pinterest and on Facebook for more inspiration.

Friday, June 3, 2016

Designer Spotlight for May 2016

Every month deflecto spotlights some of the stand-out designs by the deflecto ambassador design team. Congratulations, Nadine, Sue, Jennifer, Erin, and Anita for your outstanding designs!


Check out our designers' blog posts to see their designs and instructions~

Nadine - Mini Notepads Holder you can watch her YouTube video HERE


Nadine - Die Storage you can watch her YouTube video HERE


Bonus Projects:

Erin - Graduation Dessert Display you can watch her YouTube video HERE


Make sure to follow Deflecto Crafts on Pinterest and on Facebook for more inspiration. Happy crafting!

Thursday, June 2, 2016

Let's Celebrate the Graduate!

Every year I make graduation cards. I thought it would be fun this year to create a little sign to celebrate the occasion. The Mini Slanted Sign Holder was perfect to display my colored graduation image.


I created the banner to the top of the sign using a die cut and a Sign Tag with Wet Erase Marker.

Mini Slanted Sign Holder
Sign tag

The slanted sign holder is perfect for a desk display. It can hold a picture of the graduate!


Make sure to follow Deflecto Crafts on Pinterest and Facebook for more inspiration!
Related Posts Plugin for WordPress, Blogger...