Tuesday, February 28, 2017

SPRING BOTANICAL WALL ART FRAME

Hello, everyone! Martha Lucia here to share with you an idea that I've had in my head for a long time, and now it's a reality with the Deflecto 9"x12" Wall Art Frame

Do you like the Botanicals? I love them, so I created the perfect one for the spring season. Take a look at my project:


This frame can be hung on the wall because it comes with the tape, but since I want my spring botanical to be completely transparent, I decided to get a base in a craft store and paint it with acrylic paint to hold the frame in a horizontally.

The most particular thing in my Spring Botanical is that I made all the leaves using Rinea paper foil because it offers me the color for both sides and I don't have to worry about what side you are looking at because you will always see the same design and color. I used the glossy copper metal foil, and I love how it turned out with the different style of die cuts. It was really easy to put inside the Deflecto 9" x 12" Wall Art Frame - all I needed to do was slightly open the frame and softly insert the leaves into their positions.


The transparency of the Deflecto material is one of the best things about it for me, not only because I can see through it, but also because it is trending and I can replace the glass without any problem, so it is easily adaptable to our creative ideas. Tell me what you think below, and if you have any questions, please leave them below as well.

Thanks for stopping by, I hope you were inspired here today.
See you soon!


Friday, February 24, 2017

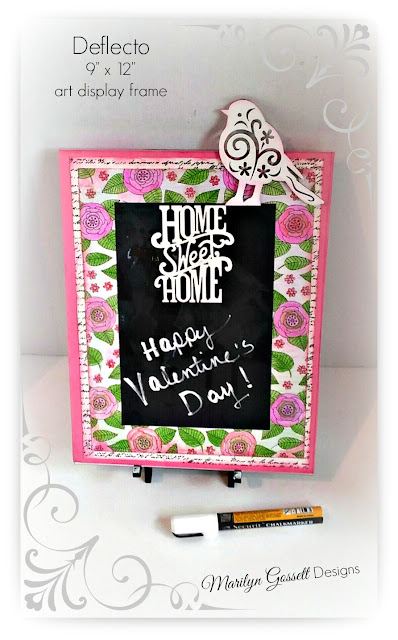
Personalize A Message Board With Colored Art!

Hello, Marylin here today sharing my latest Deflecto project. Do you own an art coloring book? Most adults that I know own at least one and enjoy bringing the art to living color as a way to beat stress and enjoy some solitude. Deflecto Crafts have a frame that is perfect for showcasing your favorite artwork. By adding some black cardstock paper, you can make it into a wet erase board to make lists and leave messages. There are many options to apply to the basic concept that I show here to make it your own!


Supplies:

12" x 12" Cardstock: dark pink, handwriting on white, black
Floral Color Art coloring book
colored pencils
laser cut wood shapes: bird, Home Sweet Home
paper trimmer
adhesives
Instructions:

Remove the frame from the wrapper and make sure that the opening is on the top side of the frame. Cut the pink cardstock to fit the frame. 

Cut the printed cardstock slightly larger than the colored art print. Layer and adhere papers. Cut a 5-1/2" x 8-1/2" rectangle of black cardstock. Adhere to the center of the art print. Insert into the frame.

Adhere the wood cut-outs to the frame.

Mount the frame using the hook and loop tape that is enclosed in the packaging.

I hope you got some inspiration from the blog today. I had a difficult time picking an art page because there are so many beautiful designs! There are a plethora of wood shapes and paper patterns to choose from. You can make it totally your own!

Make sure to take time to enjoy the small blessings along the way and
Live Life with a Flourish!

Tuesday, February 21, 2017

Crafty Ways To Use Frames

Hello, everyone!! Kymona from Kreative Kymona here again with some crafty ways to use frames!
How many of you have frames in your house put no pictures to put in them? Or you have frames but want a change from the same picture hanging option. 
Well, I have a solution for you! Add pattern paper!!

Let me show you how!


I used a wide range of Deflecto Clear Frames to create a cute candy station for my little ladies and their friends!!


For the 4 x 6 clear frame, I decorated the edges with Washi tape. Take a closer look:


For the bigger frames, I added pattern paper to decorate them. Take a closer look:


Please let me know what you think below. If you have any questions, please leave them below as well. 

Thanks for stopping by, I hope you were inspired here today. 

Make sure to follow us on Pinterest and Facebook for more inspiration!

Monday, February 20, 2017

11 DIY Craft Projects for Any Occasion eBook

We are featured in a free eBook by Fave Crafts!
This eBook comes with 11 fully illustrated tutorials including a DIY Cupcake Frame using our 4” x 6” Slanted Sign Holder Frame.

To download the free eBook visit Fave Crafts HERE
You can download the Deflecto DIY Cupcake Frame worksheet HERE


Don't miss your chance: enter today for your chance to win the stunning assortment of crafting supplies to complete the projects in this eBook. Valued at over $1,300, this prize could be yours!  
The deadline to enter is 3/12/17.

Friday, February 17, 2017

A Vintage Valentine

Valentine's Day projects don't always have to be red or pink. Instead, go for neutral colors and use embellishments with a vintage feel. That way, you can decorate a Deflecto Craft Frame to look like a cherished heirloom!


Using vintage and "faux vintage" odds and ends, I took a 4" X 6" Deflecto Craft Frame...


...and turned it into something that you might find in your grandma's attic!


Don't have any old photos to use? That's OK -- this one is a sticker from Tim Holtz! I thought this gentleman looked like someone from World War II, sending home a love letter to his best girl. I accented him with a mini metal frame and placed him on a small piece of canvas fabric.

Even though this project was done for Valentine's Day, the use of neutral colors makes it so that you can leave it out year-round!

Thank you for visiting!
Lorrie

Tuesday, February 14, 2017

Valentine Table Decorations

Happy Valentine's Day!
Monica here sharing my project using the 4" x 6" clear craft frame. A friend of mine wanted to have a Valentine get-together with a few friends and wanted to make some table decorations. We used the frame as a stand to hold mini photo albums.


Then we took some Hershey kisses and stuck them to the frames with some glue dots so they wouldn't leave permanent marks. Then decorated the cover of the albums.


Here is the inside of the photo albums... this makes a perfect keepsake. You can even stand the frame on its side once the album is decorated and use it as a display piece.


I hope everyone enjoyed my project and thanks so much for stopping by...

Saturday, February 11, 2017

This is True Love

Who is your True Love? This little princess is my true love, and I love to have her photos on display around the house. Even though this project has a Valentine theme, it is still neutral enough that I can display it all year long. For this project, I have used the 4" x 6" Clear Craft Frame which is perfect for the smaller prints I order online.


I added a beaded stick pin to the corner of my frame. I used foam tape to give my sentiment some dimension and finished this section off with a few small flowers.


In the upper corner, I added a piece of distressed chipboard to the back of the frame, adding flowers and a small ribbon bow on top. I used a variety of paints and sprays from Tattered Angels on the chipboard piece.


Friday, February 10, 2017

Deflecto Designer Spotlight for February 2017


Congratulations to the Deflecto design team members who's designs were chosen for the February 2017 Designer Spotlight! Check out their designs below.


Thursday, February 9, 2017

Give A Cute Frame This Valentines!

Hello! Nadine here and today I have a cute Valentine frame that I created using Deflecto Crafts 4" x 6" Clear Frame. I used a photo of my daughter dressed all in pink and she is looking forward to giving the frame to here Grandma for Valentine's Day. I used a hot glue gun to adhere the hearts to the frame. I have had these hearts for at maybe 9 years, I don't even remember who makes them or where I got them.


Thank you for stopping by and happy crafting!

Tuesday, February 7, 2017

A Little Valentine's Day Love


  When I looked at the calendar this morning it hit me.

One week until Valentine's Day.

After all these years of marriage...
it's still fun to throw a few hearts around to make sure he doesn't forget.

I created this cute little Valentine's decoration using a clear 4" x 6"
acrylic craft frame from Deflecto Craft Solutions, scrapbook paper and stickers.

The sticker in the middle says "I belong with you & you belong with me".
I think he'll get the hint.

Thank you for stopping by!
Sue Eldred

Friday, February 3, 2017

Give A Little Love This Valentine's Day!

Hello, Marilyn here today! Deflecto clear acrylic craft frames are a blank canvas. They are extremely versatile to be decorated and embellished and used as decor and/or signage for special events. With Valentine's Day around the corner; I made this one into a wet-erase sign that can be used over and over with whatever you would like to write on it!

Materials:

jewelry findings: round rhinestone frame with jump ring; 1/4" silver jump ring
trim: faux rhinestone trim with self adhesive back
paper punch: 1" round
dimensional medium: (Mod Podge Dimensional Magic)
cardstock: pink, black, vintage white with black writing
adhesives
paper trimmer
scissors
ink to chalk the paper edges
Instructions:

1. The frame will lay at an angle with the "bottom" as the top and the "top" as the bottom. Cut the paper and adhere the layers as shown. All of the paper will be on the inside of the frame, between the front and back panels.

2. Remove the release paper from the banner hanger and attach to the top of the frame as shown.

3. Apply one drop of the dimensional medium to the inside of the jeweled frame. Press the paper circle into the frame and hold down until it is flat. Let dry in place. Apply more dimensional medium to the inner circle and allow to dry flat.

4. Attach the jeweled frame charm to the large jump ring and then attach the jump ring to the banner hanger as shown. 

5. Marker: Bend the sign dangler around the marker. Remove the pen and make sure the ends will fit between the panels of the frame. Remove the release paper from the dangler ends and adhere to the inside panels of the frame. Embellish: Cut a single strand of faux rhinestone trim and adhere it around the sign dangler as shown. Re-insert the marker into the pen holder that you just made.

6. Write on the outside of the frame with the wet erase marker. The writing can be removed with a baby wipe or with a wet paper towel. 

7. Since Valentine's Day is just around the corner; I wanted this one to be fitting with the holiday. Use your imagination and embellish the frame any way you like, to fit with your decor at home or office. 

Enjoy!

Make sure to take time to enjoy the small blessings along the way, and
Live Life with a Flourish!


Related Posts Plugin for WordPress, Blogger...