Showing posts with label Interlocking Stacking Tower Organizer. Show all posts

Friday, November 22, 2019

Snowman Tower of Treats


Looking for a creative Christmas gift for your crafty friends? 

One thing crafty friends can always use is organization ideas, especially for tiny things like brads, eyelets, and buttons. Design team member, Nadine Carlier turned the perfect organizational idea into a sweet snowman that can be used for craft organization after the holidays.


Nadine used the Deflecto Interlocking Stacking Tower Organizer and filled each of the three sections with a different flavor of chocolate kisses. She embellished it with ribbon, face, and hat for an adorable Snowman anyone would love.


After the Holidays, it is perfect for when you need storage options.


Create Store, Create More or #Cr8StoreCr8More for storage

Monday, November 4, 2019

Sharing Kindness


It only takes a moment to share a little kindness.

Inspired by World Kindness Day coming up on November 13th, Design Team Member, Lorrie McCullers used the Interlocking Stacking Towers to create blessing boxes to be handed out in her community. Blessing boxes are kits that provide essentials for those in need.


The Deflecto Interlocking Stacking Organizer comes with three individual containers and six interlocking lids. The great part about these containers is that they can be put together in a variety of configurations and different sized items. The lids and containers lock together so that you can create an organizer that is perfect for anything you want to put into your blessing containers.

Friday, January 5, 2018

Time to Get Organized - My Favorite Tips

Are you crazy about organization like I am? I simply cannot create unless everything in my studio is in its proper place. Deflecto products are simply great at helping me keep everything in order and where it belongs. Here are my favorite products and tips for getting your craft space organized.


Craft Tilt Bins™ are one of the best ways to help keep order. You can fill a wall with them -and store more than you can imagine. Here I have organized paints, mediums, brushes, and inks all in one place. I have removed some of the actual bins to better store my smaller bottles of paint.


Everything in this bin went into the Craft Tilt Bins™ above. Everything is so much easier to see, get to, and work with now.


I also have a set of the Interlocking Stacking Tower Organizers on top of the bins. Remember their lids store safely on the bottom of each piece so they never get lost! I have assorted brushes, pens, and other odd size things in them that I use regularly.


Stackable Cube Organizers are great for storing things that are a little taller. Here I have my set of Tombow Dual Brush Markers (which are TALL) in one of the "X" bins. I also store washi tape and small Xyron machines in this set. These cubes easily attach on the sides so that they are stable on your shelf or table.


More Cube Organizers and Interlocking Stacking Tower pieces keep my stationary and smaller bits and pieces corralled and neat. Use a fancy punch and cardstock to add labels to the front of your drawers so you can see what is in each one. 


The Rotating Organizer was a real life saver to clean up the clutter on my desk. I had multiple small buckets that took up a lot of room. By removing the tops from the bins I am able to store my most used supplies right on my desk in very little space. The very best thing - it SPINS! So I can easily reach whatever I want quickly.


I store my adhesives, pens, additional brushes, my camera all in one small spot. I toss odd and end embellishments in two of the bins. Those little bits that are left from a package of embellishments go in here so they are front and center; I am able to use them up without forgetting about them in a drawer.


Hands down my favorite piece are the Stackable Caddy Organizer. Y'all --- I LOVE these things. Seriously. Go get yourself some right now. I'll wait. ..... Are you back?  These caddies are AMAZING. Here you can see my Interlocking Marker Organizers in the top caddy. I love these because they have flexible grids inside that hold markers and pens in a variety of sizes.

Do you go away to crops? These are great for travel. You can fill them up,, stack them up, head off to crop, and be prepared to beat people off with a stick. I'm not kidding. We all know space is at a premium when at a crop, so you can store a huge amount of supplies in a little bitty footprint.

That's it! My very favorite storage tips for getting your craft space organized. I hope you give some of these a try. Be sure to post your photos on the Deflecto Facebook page - I would love to see them!

Tuesday, September 5, 2017

Interlocking Storage for Snacks

Hello, everyone! Martha Lucia here to share my Snack Time with all you Deflecto fans. I am using the Interlocking Stacking Tower Organizer to keep and "control" the snacks in my office. You know that I love candy and snacks, but with these containers is easy to control the portions and "decide" what I want. Take a look at my tower:


Sometimes I want something sweet or something salty, and other times I can't decide. I decorated each container using vinyl silver or white with a lattice design that I cut using my big shot and a die cut. Then I cut a label in red vinyl with a die cut too and finally, I created a name for each container using a label machine.


The advantage of these containers is that the lids and bases are removable so you can have one single container, or two, or three! You can refill them whenever you want because you can see through it. They are also ideal for the on-the-go option!


What do you think? Another way to keep our snacks without spilling on our desk!!!
Thanks for stopping by, I hope you were inspired here today!

Friday, January 20, 2017

Getting Organized This New Year

It's a brand new year, and that means it's time to get organized! 
It's Anita from The Flamingo Chronicals, and I am a bit of a neat freak. Maybe more than a bit. OK - maybe a bit OCD. Having my supplies neat and organized makes it so much easier to get my projects done. And having my studio clean and neat just makes me happy.


The Stackable Storage Cubes are perfect for organizing your craft supplies. I have used two here; the 4 Drawer Cube and the Cube with the "X" Divider which I removed to hold my envelopes for an upcoming project. Also shown is the Interlocking Storage Tower; I have separated the 3 canisters and used them to hold chalk pens, paintbrushes, and other supplies.

Check out the Deflecto Facebook and Pinterest pages to see more ways to use these and other storage pieces.


Thursday, January 12, 2017

Stylish Bathroom Organization

Looking for some easy and stylish DIY bathroom storage ideas?!! Well, I am here to show you how you can turn Deflecto's storage products into a perfect Princess bathroom.


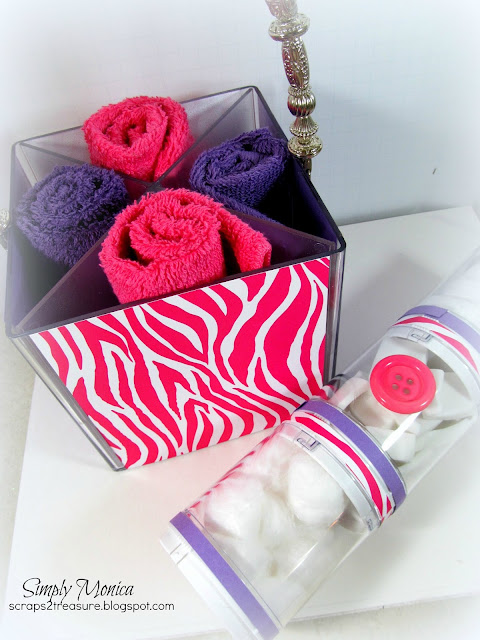
My friend has a daughter who is in love with pink and purple and recently started redecorating her bathroom.  So I wanted to think of something nifty and cost effective, so I used the Stackable Cube Organizer "X" Divider and the Interlocking Stacking Tower Organizer 3 Canister to make a decorative rag holder and then I used the canister to store cotton balls, makeup sponges and the cloths. I wanted to put some Q-Tips in them, but I sort of ran out of them. Once I get some I am actually going to switch it out. 


I covered them using patterned paper from Canvas Corp Brands the hot pink zebra print was absolutely perfect! I used my Xyron Creative Station to adhere the paper to the sides and I then cut some strips to cover sections of the canister (which does not interfere with opening or closing the canisters. After I popped on a hot pink button to finish it off. I think I am going to make a neat decorative piece using the same concept for an adult bathroom. Oh, then to make it super cute and girly I added a handle just like it was a purse!


I hope everyone enjoyed my post for the day and thanks so much for stopping by!

Tuesday, January 10, 2017

Deflecto Storage For All Areas Of Your Home

Hello, everyone! Marilyn here today sharing my latest Deflecto project.
Deflecto storage is excellent for all sorts of things in the office and at home. I am giving my vanity an update and chose several Deflecto products that I love for this project! Shown below are 2 of the storage cubes that I have stacked and attached together with the metal connector that comes with each cube. The cubes can be arranged as side by side or stacking. I am using the Deflecto X-Divider Cube to hold cosmetic brushes and the like. Pencils, anything that lies flat can go in these compartments.


The Interlocking Stacking Tower Organizer comes with separate lids that come apart or stack. I have taken these apart, and I am using them as containers for cotton balls, cotton swabs, and wedge sponges. 
Pictured below are the components for the storage compartment that I created. Read on, to the next set of photos, and I will show you how to cut the burlap.

You will need:

Joy embroidered letters: 1-1/2" Monogram black (I used my initials)
cording trim: beige in 1/8" and 1/4" (several yards of each)
Mod Podge: matte with brush
burlap with fleur del ur pattern
scissors
adhesives: glue gun; tacky glue


Instructions:

1. Measure the width and length that you want to cut your fabric. The cubes are 6" x 6". I measured and cut a 6" x 30" piece for the sides and the top. The back pieces were measured and cut in 6" squares with the patterns matching up before adhering to the storage containers.

2. Find a string in the burlap and pull it the length of the piece you will be cutting. Pull the string all the way out without breaking it. If the string breaks, cut up to the place the string broke off and continue pulling the same string. This will give you the guide you need to cut the burlap straight and not get fraying.


3. Below is a photo of the burlap being cut along the guide line. This is a sure-fire way to cut your burlap and be happy with the results! Designer Tip: If you are cutting individual pieces for a placemat or the like; pull and remove the strings on each side to create a fringe.


4. I applied Matte Mod Podge to the surface of the storage bins and to the wrong side of the burlap. Make sure to cover your surface with wax paper or freezer paper before moving on with this step. Adhere the burlap to the top and sides of the containers. Then, finish by adhering the squares to the back. I left the bottom without fabric.

5. Use a glue gun (or whatever works best for you), to adhere the cording trim to the edges of the container as shown. 

6. Cording Medallions: Create the cording medallions by pinching one end of the cording together and gluing to a scrap of burlap. Continue by creating a spiral; gluing as you go; until you have the size that you desire. Cut the medallion out; concealing the burlap edges. Repeat for each medallion. Adhere to the storage container as shown.

7. For the storage containers: Separate into 3 containers with lids. Follow the instructions for the cording medallions and create a medallion for the inside of the top lid of each container. Adhere the monogram letters to the medallion inside each lid. Adhere cording around the outside edges; top and bottom of one container. Make sure not to interfere with the interlocking portion of the container. Repeat for the others. Finish: Apply medallion to the front of the cube storage and adhere a monogram letter. Enjoy!

Deflecto has your New Year's Resolutions covered! We all aspire to clean up our clutter and make the new year bright, right?? Deflecto can be found in various craft stores and on Amazon. Check out the link given to peruse the products that are offered.

Thank you for checking out my blog today. I hope you have a wonderful year ahead....take the time to enjoy the small blessings along the way; and...

Live Life with a Flourish!
Marilyn

Friday, December 23, 2016

Interlocking Stacking Tower Organizers Make Great Gifts!

Hello everyone, Marilyn here today! JOY TO THE WORLD! Christmas is just around the corner, and it is time to start thinking about the gifts we want to give and how we want to decorate. I think everyone loves snowmen and Joy letters make gift giving fast and easy! Everyone loves a message of JOY, and you can bring others joy with the quick and easy design I am showing here today.

Materials:

1-1/2" embroidered letters: J O Y
rick rack: 1/2" red
ribbon: 5/8" black & silver; 12"
candle light: Snowman
adhesives
scissors
candy or gift to place in the container
Instructions:

1. Remove release paper from the back of each letter and adhere to the canister as shown; one letter to each compartment.

2. Adhere a piece of ric-rac to the top of each compartment; not interfering with the lock. Line up the seams in the back.

3. Bend the sign dangler accordion fashion or as you would a fan. Remove the release paper from each end. Adhere one end to the top of the lid. Adhere the candle light snowman to the opposite end. This may take some extra adhesive to hold the light in place.

4. Fill the canister with candies or other surprises for the recipient. Finish with a bow under the chin!

Enjoy the coming holidays! A gift from the heart is always a pleasure for the giver and the receiver.

Merry Christmas and may you have a very happy New Year!

Friday, October 7, 2016

"BOO" Your Friends With The Gift Of Deflecto!

Do you like to "BOO" your friends and neighbors? I have the perfect treat! This set of Interlocking Storage Organizers can be used for storing all kinds of supplies after the treats are gone. It only takes a few supplies to convert one to the perfect treat container!

For this project, I gathered just a few supplies.


Ribbons: 1-1/2" black and white grosgrain; 3/8" orange polka dot grosgrain.

Cardstock Paper: 12" x 12" white with black polka dots

Die Cut: 2-1/2" Circle

Adhesives

Scissors

Candy

Misc. embellishments


Instructions:

1. Cut the ribbon to fit around one container. Overlap the ends and adhere. Repeat for each container. Layer the orange ribbon over the top of the black and white ribbon.

2. Open the containers and adhere a polka dot circle to the top of each lid.

3. Add candy or other treats to the containers and replace the lids.

4. Make a loopy bow with the orange ribbon and adhere to the top of the cannister.

5. Adhere additional desired embellishments. (I adhered a black pom-pom to the top of the bow.)

6. Now it is ready to "BOO" somebody!


Thanks for stopping by the blog. Hope you got some inspiration here today. I enjoy comments. If you have a comment or question; please post it below.

Make sure to take time to enjoy the small blessings along the way and

Live Life with a Flourish!


Make sure to follow us on Pinterest and Facebook for more inspiration!

Tuesday, July 26, 2016

GIRLS GUIDE TO CAMPING

GIRLS GUIDE TO CAMPING

BY LYNN LILLY From Craft box girls
A year ago in April I went camping for my very first time. This camping trip was spurred on by a client who wanted Craft Box Girls to appear at their Bonnaroo activation as DIY Experts. Rosanna and I set out on a journey to make our first camping trip a great experience and take notes along the way to share it with other first time campers. Since this first camping trip, I have been camping two times and might call myself a pro (maybe-eeee). I have compiled a list of helpful tips, key products and useful information to make your first time camping trip a great experience in true girl fashion.

Start Organized & Stay Organized

Start organized and stay organized. Deflecto's Stackable Caddy Organizer is my go to for camping organization. From packing camping tools and key supplies to toys and craft supplies to keep the kids occupied on the campsite, the Stackable Caddy Organizer is the perfect solution to stay organized.


The organizers also have a nifty lift and lock feature that provides for easy stacking and traveling!


When it comes time to showering, it is important to find out ahead of time if the campsite has showers. If so you want to be prepared with a waterproof shower caddy (the one pictured is from the Dollar Store), shower shoes and all your shower supplies. I always carry my soap in a washcloth turned soap pocket and my shampoo, body wash and lotion in Deflecto's Interlocking Storage Tower. The Storage Tower provides compact storage that is waterproof and easily fits travel size bottles.


For more useful tips on what to bring when camping, visit the Craft Box Girls Post here.

Make sure to follow Deflecto Crafts on Pinterest and Facebook for more inspiration!

Tuesday, July 5, 2016

MAKE ROOM: STACK & STORE


Summer is the perfect time to get organized! Watch in this video how Lynn Lilly from Craft Box Girls uses our Interlocking Storage Towers to get organized.


Make sure to follow Deflecto Crafts on Pinterest and Facebook for more inspiration!

Happy Crafting!

Related Posts Plugin for WordPress, Blogger...