Monday, January 30, 2017

12" x 12" FRAME WEEKLY PLANNER

Hello crafty friends, Martha Lucia here with a very practical idea that I created using a 12"x12" decorated paper and 12"x12" Deflecto Frame. My resolution this year is to stay organized, and with this weekly planner I can visualize my activities or my projects along the week and keep the focus on these.


To create this, I used the dark side of the 49 Shades of Grey 101 Paper Collection. I love this dark chalk look, and I decided to cut the days of the week using the white side of the same paper. I cut each letter using an alphabet die cut set, and then I adhered the letters with a liquid glue on the left side of the sheet. To decorate the right side, I randomly stamped a branch of flowers with three different colors of PowderPuff Chalk Ink. I used the colors Green Leaf, Pixie Pink and Lemon Sorbet of PowderPuff Chalk Ink.


As you can see in the photo above, the light colors of the chalk ink are more visible. Since I wanted to use this page inside of my Deflecto 12"x12" Frame, the stamping works great because it won't compete with the information when I write over the frame with an erasable marker.


Thank you so much for visiting us today and come back soon for more creative inspiration! 


Friday, January 27, 2017

Practical Storage Solutions Part Two

Hello, everyone!!  Kymona from Kreative Kymona here again with part two of my practical storage solutions for some of your crafting supplies!! If you missed part one, please click here.

How many washi tapes do you have all over your craft space? How many draws do they occupy in your house?  How many did you forget that you have?  Well, I have a practical storage solution for you!


It holds about 76 washi tape rolls!! Wow, right!!  I'm so excited about this storage solution.  Now I can see all of my washi tapes in one glance.  

Let me tell you about this cube:

1. It has four draws, long in length!


The four draws are long in length that allows for about 20 washi tape in each depending on the size.  I placed some of the thin tapes on top of the ones you see now. 

2. They have an interlocking system, and the container is clear so you can see everything!!


If you look at the top of the cube, where the stars are, you will see the interlocking slip where the clip goes. These cubes will stack on top of each other.  I love that you can see through the containers.  I can see all of the different options I have. 

Take a look at both of my practical storage solutions together.


Sooooo, tell me what you think? Are you still looking for a way to store and organize washi tape or other craft products? I hope I was able to help you make up your mind.

Please let me know what you think below. If you have any questions, please leave them below as well. 

Thanks for stopping by, I hope you were inspired here today. 
Come on back for part two of practical storage solutions!

Make sure to follow us on Pinterest and Facebook for more inspiration!

Tuesday, January 24, 2017

The Perfect Coffee Organization Station

Hey, everyone! Lorrie here and one place in my house that needs organization is my kitchen. I need for everything to have a place and to be easily accessible. That's especially true for my coffee area. When I go for my daily cup of java, I want to be able to get to it as quickly as possible (so that it can work it's magic even faster), so I decided to organize my KCups using the Stackable Four 4-Drawer Cube Organizer!


I started with a clear Stackable 4-Drawer Cube. These cubes are fantastic because they can be used to hold so many different things. In this case, the little drawers hold KCups perfectly!

I decorated the sides with 6x6 kraft paper that I stamped with an adorable coffee cup and little coffee bean images.


Next, I stamped more coffee cups on kraft paper, but this time, I cut out each individual image and placed them on each little drawer face.


For the top, I used a 6X6 piece of patterned paper. I then attached two large canvas flowers and finished them with another coffee cup as the center. For the finishing touch, I used embroidered letters to spell out "coffee".


Now my KCups are organized, making my morning cup o' joe a little easier!
Lorrie

Friday, January 20, 2017

Getting Organized This New Year

It's a brand new year, and that means it's time to get organized! 
It's Anita from The Flamingo Chronicals, and I am a bit of a neat freak. Maybe more than a bit. OK - maybe a bit OCD. Having my supplies neat and organized makes it so much easier to get my projects done. And having my studio clean and neat just makes me happy.


The Stackable Storage Cubes are perfect for organizing your craft supplies. I have used two here; the 4 Drawer Cube and the Cube with the "X" Divider which I removed to hold my envelopes for an upcoming project. Also shown is the Interlocking Storage Tower; I have separated the 3 canisters and used them to hold chalk pens, paintbrushes, and other supplies.

Check out the Deflecto Facebook and Pinterest pages to see more ways to use these and other storage pieces.


Tuesday, January 17, 2017

Plan To Get Organized


Now that the house is a bit calmer and my to-do list is quite a bit shorter...
I’ve been able to work in my office again.
It feels good sitting down, organizing my thoughts, throwing away old notes…
Planning for the New Year.

I’m a planner, a list maker.
I love the clean slate that a new calendar gives.


One of the ways I like to organize is by giving items a "home."
By putting "like" items together, everything starts making sense.

The 4 Drawer Stackable Cube Organizer works great for small items on my desk or anywhere
I might need a little organization. Great in the kitchen, bathroom, and even the garage.


For fun, I personalized my organizer by adding buffalo plaid scrapbook paper around the outside
and labeling each drawer with chalkboard stickers.


I even made myself a mini desk calendar using a 3" x 4" clear acrylic stand, leftover scrapbook and a cute little calendar from Taylored Expressions.

For more from Sue Eldred visit her blog Sue's Creative Workshop.

Sunday, January 15, 2017

Watch Us On A Livestream With Charity Wings

We are proud to sponsor "Destination Creativation Discover CHA with DecoArt and Charity Wings". It's a fun Online Tour and Trivia Hunt Jan 21, 9 am - 5pm through the all-new Craft & Hobby Association Trade show floor! There will be tons of Giveaways including a Grand Prize- Front Porch Makeover with Mark Montano! Charity Wings Art Center will be hosting this FREE Event on the Craft & Hobby Association Facebook Live or you can download the Charity Wings App. For more details http://www.creativationshow.org/events-and-features/trivia-hunt

Saturday, January 14, 2017

Practical Storage Solutions

Hello, everyone!! Kymona from Kreative Kymona here again with part one of my practical storage solutions for some of your crafting supplies!!

I've been practicing my brush lettering for awhile now, and I've accumulated so many different types of brush letter markers that I wasn't sure where to store them. They were in pencil cases, drawers and other places that I couldn't see them in plain site. 

I needed a better and practical storage solutions for my markers. I found a solution that I love. 


These storage cubes are a super practical storage solution for any set of pens, markers, crayons, pencils, paintbrushes, scissors or any item that you need to see while crafting. 

Let me tell you about these cubes:

1. They have four different compartments! 


The four compartments allow me to separate out all of the markers by the maker. This is easy to see what markers I'm working with. The "X" feature also divides the compartment evenly as well.

2. They have an interlocking system!


This interlocking system is perfect if you have more than one cube. It keeps the cubes together. They do not move or slide around on the table. 

3. The container is clear so you can see what's inside!


I love being able to see what's inside of each compartment. When your pens are in pencils case or drawers, it's harder to remember what you have vs. placing them in this cube where you can see your entire collection all at once. 

These cubes are a perfect addition to Deflecto's Stackable Caddy Organizer! If you didn't see that post, click here.

Sooooo, tell me what you think? Are you still looking for a way to store and organize your markers, pens, pencils, crayons, etc.? I hope I was able to help you make up your mind.

Please let me know what you think below. If you have any questions, please leave them below as well. 

Thanks for stopping by, I hope you were inspired here today. 
Come on back for part two of practical storage solutions!

Make sure to follow us on Pinterest and Facebook for more inspiration!


Thursday, January 12, 2017

Stylish Bathroom Organization

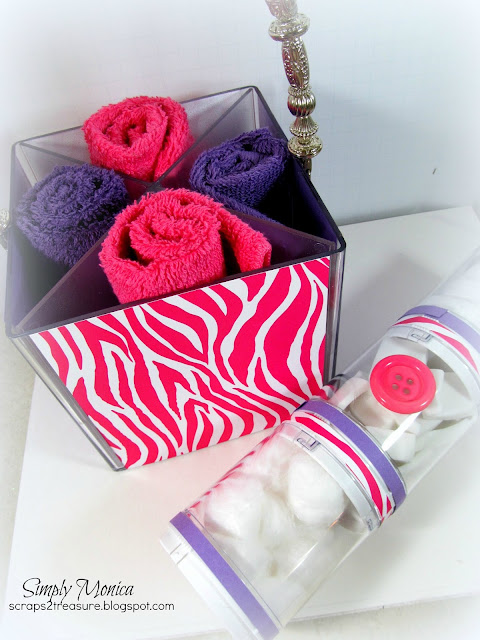
Looking for some easy and stylish DIY bathroom storage ideas?!! Well, I am here to show you how you can turn Deflecto's storage products into a perfect Princess bathroom.


My friend has a daughter who is in love with pink and purple and recently started redecorating her bathroom.  So I wanted to think of something nifty and cost effective, so I used the Stackable Cube Organizer "X" Divider and the Interlocking Stacking Tower Organizer 3 Canister to make a decorative rag holder and then I used the canister to store cotton balls, makeup sponges and the cloths. I wanted to put some Q-Tips in them, but I sort of ran out of them. Once I get some I am actually going to switch it out. 


I covered them using patterned paper from Canvas Corp Brands the hot pink zebra print was absolutely perfect! I used my Xyron Creative Station to adhere the paper to the sides and I then cut some strips to cover sections of the canister (which does not interfere with opening or closing the canisters. After I popped on a hot pink button to finish it off. I think I am going to make a neat decorative piece using the same concept for an adult bathroom. Oh, then to make it super cute and girly I added a handle just like it was a purse!


I hope everyone enjoyed my post for the day and thanks so much for stopping by!

Tuesday, January 10, 2017

Deflecto Storage For All Areas Of Your Home

Hello, everyone! Marilyn here today sharing my latest Deflecto project.
Deflecto storage is excellent for all sorts of things in the office and at home. I am giving my vanity an update and chose several Deflecto products that I love for this project! Shown below are 2 of the storage cubes that I have stacked and attached together with the metal connector that comes with each cube. The cubes can be arranged as side by side or stacking. I am using the Deflecto X-Divider Cube to hold cosmetic brushes and the like. Pencils, anything that lies flat can go in these compartments.


The Interlocking Stacking Tower Organizer comes with separate lids that come apart or stack. I have taken these apart, and I am using them as containers for cotton balls, cotton swabs, and wedge sponges. 
Pictured below are the components for the storage compartment that I created. Read on, to the next set of photos, and I will show you how to cut the burlap.

You will need:

Joy embroidered letters: 1-1/2" Monogram black (I used my initials)
cording trim: beige in 1/8" and 1/4" (several yards of each)
Mod Podge: matte with brush
burlap with fleur del ur pattern
scissors
adhesives: glue gun; tacky glue


Instructions:

1. Measure the width and length that you want to cut your fabric. The cubes are 6" x 6". I measured and cut a 6" x 30" piece for the sides and the top. The back pieces were measured and cut in 6" squares with the patterns matching up before adhering to the storage containers.

2. Find a string in the burlap and pull it the length of the piece you will be cutting. Pull the string all the way out without breaking it. If the string breaks, cut up to the place the string broke off and continue pulling the same string. This will give you the guide you need to cut the burlap straight and not get fraying.


3. Below is a photo of the burlap being cut along the guide line. This is a sure-fire way to cut your burlap and be happy with the results! Designer Tip: If you are cutting individual pieces for a placemat or the like; pull and remove the strings on each side to create a fringe.


4. I applied Matte Mod Podge to the surface of the storage bins and to the wrong side of the burlap. Make sure to cover your surface with wax paper or freezer paper before moving on with this step. Adhere the burlap to the top and sides of the containers. Then, finish by adhering the squares to the back. I left the bottom without fabric.

5. Use a glue gun (or whatever works best for you), to adhere the cording trim to the edges of the container as shown. 

6. Cording Medallions: Create the cording medallions by pinching one end of the cording together and gluing to a scrap of burlap. Continue by creating a spiral; gluing as you go; until you have the size that you desire. Cut the medallion out; concealing the burlap edges. Repeat for each medallion. Adhere to the storage container as shown.

7. For the storage containers: Separate into 3 containers with lids. Follow the instructions for the cording medallions and create a medallion for the inside of the top lid of each container. Adhere the monogram letters to the medallion inside each lid. Adhere cording around the outside edges; top and bottom of one container. Make sure not to interfere with the interlocking portion of the container. Repeat for the others. Finish: Apply medallion to the front of the cube storage and adhere a monogram letter. Enjoy!

Deflecto has your New Year's Resolutions covered! We all aspire to clean up our clutter and make the new year bright, right?? Deflecto can be found in various craft stores and on Amazon. Check out the link given to peruse the products that are offered.

Thank you for checking out my blog today. I hope you have a wonderful year ahead....take the time to enjoy the small blessings along the way; and...

Live Life with a Flourish!
Marilyn

Friday, January 6, 2017

LET'S GET ORGANIZED

Happy 2017 crafty friends, Martha Lucia here! Are you ready to get organized? Organization is one of my resolutions this 2017! Clear and simple, something that only Deflecto can offer me. I am the type of person that loves to have everything organized, but I often forgot where I put things, so clear storage and labels are the best solutions for me.


Deflecto Crafts has different designs of cubes that you can use single or together. I found the Deflecto 4 Drawer Cube perfect for the bottles of my Mist, so I organized them by colors and marked each compartment with the line of colors and type of mist. In the X-Divider Cube, I put some markers, brush pens, and Irresistible or sprayed Inks.


One of the benefits of these cubes is that you can stack them horizontally or vertically. They come with a special piece to secure them in the center of each box. This piece is easily adaptable and removable.


The transparency of the cubes lets me see what is inside of them and refresh my memory. It is another way to know what exactly I have and what I want to use or what I "need" to buy...

I hope my resolution will inspire you to have all your things organized and use it more!

See you soon!!!

Wednesday, January 4, 2017

The Perfect Chore Calendar

Happy New Year! Nadine here sharing a chore calendar I created to help organize my daughter's chores. I used the 12 x 12 Clear Craft Frame to get my project started. I used a patterned 12 x 12 scrapbook paper and then cut a 10 x 10 piece from a piece of white cardstock. Drew a calendar grid on the white piece and adhered it to the patterned paper and slid it into the 12 x 12 frame.


 Then I used a Flexible Sign Holder, removed the backing from one of the adhesive sides of the Flexible Sign Holder and slid it into one of the sides of the frame. This worked great to hold the Wet Erase Markers which I used to write on the outside of the frame. 


The best part of these markers is all you have to do is use a wet wipe or a wet paper towel to white the frame off and start over for a new month.


For a little extra incentive to get the chores done, I attached some money onto the frame with a VersaGrip™ Double-Clip Sign Holder.


Thank you for visiting and happy crafting!

Related Posts Plugin for WordPress, Blogger...