Friday, August 25, 2017

Deflecto Designer Spotlight for August 2017


Congratulations to the deflecto designers whose blog posts have been chosen for the month of August. Check out their projects and instructions on the links given below!


Anita Scroggins 


Kymona Tracey

Marilyn Gossett

Martha Lucia Gomez Hernandez


Make sure to follow us on Facebook and Pinterest for all of our design teams inspiration.

Tuesday, August 22, 2017

Sue and Nick's Craft Caddy Challenge

The challenge was to see who could fill their craft caddy the fastest.


Each day, at the "Creativation Trade Show" last January, Deflecto held the very popular Craft Caddy Challenge. All though lots of fun, at times, it became quite competitive. 
I was talking about the challenge to my grandson the other day and we decided to have our own 
Craft Caddy Challenge. (I needed to race someone my own speed.)
Nick enjoyed the caddy challenge so much that when my nieces came over to swim later, he challenged them. He was a lot faster by then. (he won by a mile)

Friday, August 18, 2017

Take a Look at Deflecto's Caddy Wheel Base

Hello everyone!! Kymona from Kreative Kymona here today share a new product that Deflecto release back in January at Creativation. I'm so excited about it.

Take a look at Deflecto's Caddy Wheel Base


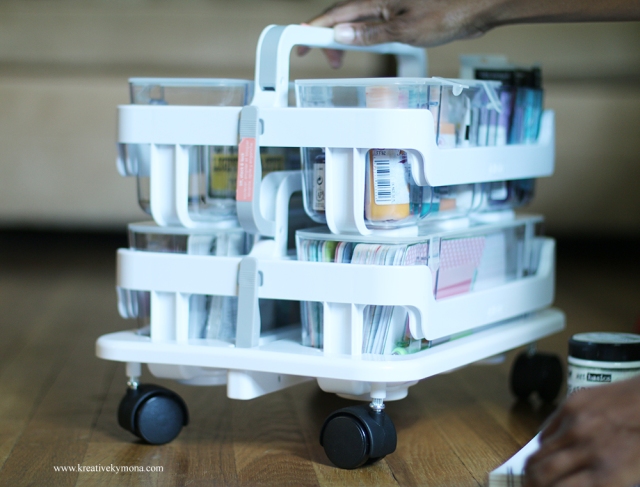
Yes, the long awaited wheel base to go with their fabulous Caddy Organizer!!

When I saw the Caddy Wheel Base at Creativation, I couldn't wait to get my hands on one. I could push my supplies across my living room floor without any problems. LOL!!
Let's a closer look: 


Here are some facts about the Caddy Wheel Base:

The wheels swivel that lets you move an entire stack of supplies safely and easily. 
It moves easily on carpet. 
It has a lift and lock tab that secures multiple Caddy Organizers to the Caddy Wheel Base. 


You stack as many caddies as you have that you're able to push or pull. 
It's perfect for scrapbooking crops or any craft retreat. No table space needed. 
The Caddy Organizer is sold separately. 

I can't wait to get more caddies so that I can have all of my supplies all in one place. 

While at Creativation, I had so much fun pushing a stack of Caddy's around the convention floor.
Check it out:


That's 6 caddies on the wheel base!! 

Think about all of the supplies you could have in 6 caddy's with you on a craft trip!!

So what do you think? Where will you use your Caddy Wheel Base loaded with Caddy Organizers? I would love to hear from you.

Thanks for stopping by, I hope you were inspired here today.

Make sure to follow us on Pinterest, Facebook, and Instagram for more inspiration!
You can purchase the Stackable Caddy HERE at Target.

Tuesday, August 15, 2017

Deflecto Craft Caddy

Hello everyone, Martha Lucia here to share my new Craft Caddy from Deflecto. I am thrilled because now we can find the Stackable Caddy in another store, Target. And we can build our own version of craft caddy with all the levels that we want. Take a look at mine:


I decided to use the first level to carry my adhesives, little spray's and enamels and the second level to store embellishments. I marked one side of the white frame of the Stackable Caddy with the name of my blog, and to create it I used vinyl of two different colors and my Cricut Explore. For the other side, I created a striped design using vinyl and some die cuts on my big shot.


On the white frame, I tried to align all the colors and designs because as you may have noticed I love to sync everything. But the best part of my decoration is when I want to go to shows or crops because I can easily identify my Craft Caddy. It is very easy, I just need to put all and secure the caddies on the Stack'N Go Caddy Wheel Base, and all without taking advantage of these removable storage containers.


What do you think? This is a wonderful storage cart for our crafts, you can move it around your house and carry individual compartments whenever you want!

You can purchase the Stackable Caddy HERE at Target.

Thanks for stopping by, I hope you were inspired here today. I would love to hear from you!

Friday, August 11, 2017

Bathroom Organization

Hello, Nadine here today! One thing my bathroom is completely lacking is storage space. I have no drawers to keep my smaller items in like my makeup. The Deflecto's Craft Tilt Bin was the perfect solution for me. Since it hangs up on the wall, it frees up my counter, and it also gives me a shelf to put more items on.
My plan is to get more to add above this one, they interlock (slide) together so you can easily add more of them.


The Deflecto Interlocking Craft Tilt Bins come in different bin sizes. The one I use is the 5 bin, but you can also get them in 4 bin6 bin and also single bins. I currently am using all the sizes in my craft room and love them all.


Each bin tilts out for easy access, and they can also be removed so you can bring them to where you need them. I blinged mine up with some rhinestone trim and used alpha stickers on the labels that come with the unit.


Thank you for stopping by!

Wednesday, August 9, 2017

Announcing Our New 2017-2018 Design Team

Congratulations
and welcome to our new Deflecto Design Team for 2017 – 2018!


We welcome back Marilyn Gossett, Nadine Carlier, Anita Scroggins and Kymona Tracey! Our newest additions are Rosie Nunez, Alexandra Stapleton Smith, Jessica Litman and guest designer for September and October, Josefine Fourage! We would like to take the opportunity to thank everyone who submitted for the new design team. We so appreciate your interest and hope that you will stay in touch! We are continuing to expand our Deflecto family within the crafting community and look forward to meeting you all! Our outgoing designers will remain members of our Deflecto family. Thank you for the valuable contributions of sharing your time and creative talents! We will be seeing you!

Tuesday, August 8, 2017

Dinosaurs for Adoption


The princess is having a dinosaur birthday party this year. My daughter wanted an "adopt a dinosaur" station at the party so the littles could pick their own favors to take home with them. I used the Deflecto™ 5 X 7 Beveled Frame for this cute little sign. I love these frames because they come apart into two pieces. I almost always decorate the front part of the frame with larger, chunky, embellishments, but I am still able to swap out the photo on the inside of the frame as often as I want!


I used some pre-painted wood embellishments found at the local arts and crafts store. I added a few leaves, and some buttons to finish off the outside of the frame. For the inside, I printed my sign using a word processing software, trimmed it to fit, inked the edges, and added some stamped leaves. Once the party is over, I am going to swap out the sign for a fun photo of the birthday girl!

Friday, August 4, 2017

Beveled Edge Frame

Hello crafty friends, Martha Lucia here to share with you a fun project that I made using the Deflecto Craft Frame 5"x7" or Beveled Edge Frame. It is a frame with metal knobs and green tinted edge that looks like real glass. I made a frame to remember when we were 5, and when I say we, I am talking about my husband, my daughters and I.


The advantage of this frame is that you can open and put your designs inside and then close it again. I selected decorated papers to create the mats of the photos. Then I cut a banner die cut and the number 5 other designs of papers. I pasted all these pieces directly using snail adhesive.

The interesting part is how I obtained the photos. The original photos of this frame are 8" x11". I scanned them using my Canon PIXMA TS 9020. Since this printer works wirelessly, this process is pretty easy, and the machine sent the photos directly to my albums. For my next step, I just have to select the design that I want to print and select the photos and order to print. I chose the size 4"x6". After printing the four photos on a single layer, I cut the photos and arranged them on the decorated mat that I created for the frame. 

I closed the frame and voila! The best part is that with the knobs I can change the photos or designs of my frame easily.

Thank you for stopping by and see you soon with more inspiration!!!

Thursday, August 3, 2017

Deflecto Designer Spotlight for July 2017

Congratulations to the Deflecto design team members whose designs were chosen for the July 2017 Designer Spotlight!


Check out their designs below:


Thank you for visiting!

Make sure to follow us on Pinterest and Facebook for more inspiration!

Wednesday, August 2, 2017

Bead Storage with Deflecto

Hello, Marilyn here today sharing how I decorated a Deflecto Interlocking Storage Bin for bead storage. This versatile bin can be placed on the work table for easy access or attached to the wall. Each bin tilts out giving full view to the contents.
Materials:

Deflecto: Interlocking Multi-Bin Storage Organizer; 5 bin unit #20503CR

Joy: 3" Embroidered Letters; navy blue (letters also come in white and red)

Cardstock: 12" foil; navy blue, silver

Punches or die cut: circles, 1-1/4", 1/2"

Adhesives
Instructions:

1. Embroidered letters: Line up letters on the front of tilt bins. Remove the backing and adhere evenly to the front of the bins.

2. Punch or die-cut circles from the cardstock. Cut 1-1/2" circles from navy blue and 1/2" circles from silver. Place and adhere circles to the white portion of the storage as shown.
Thank you for stopping by the blog today. Hope you will enjoy some high quality Deflecto storage. They have all of your storage needs covered!
Related Posts Plugin for WordPress, Blogger...