Showing posts with label Sign & Banner Hanger. Show all posts

Tuesday, July 11, 2017

Creative Storage


Hi, crafters! Team member Monica here sharing an innovative use for your Deflecto Craft: 


I stuck the Sign Hangers on the outer edge of my table which sits at a sort of slant and added the Pear Clips to serve as a holder for my Fun Flock. I am one of those types of crafters that believe in "out of sight, out of mind." So, seeing my flock will encourage me to actually use it. I also used it to hold me enamel dots, and the hangers are so strong that you don't have to worry about if falling on the floor and you can sort of flip through your colors because the hangers sort of swivel. 


Here they are at an angle. I also used these to organize my parents million prescriptions. They regularly stored them in a basket now they are all perfectly lined up where they can see what they have. MY flock is so much prettier than a bunch of pill bottles, so I felt this was a better picture to show lol....


I hope everyone enjoyed my post and be sure to grab a bunch of these because the possibilities are endless!!! Happy Organizing...

Friday, May 19, 2017

Golf Themed Birthday Party

Throw a Golf Themed Birthday Party for the golfer in your life with Deflecto!
We recently celebrated a milestone birthday for my husband, who is quite the avid golfer. He’s been playing golf since he was a kid and even caddied as a teen. It only seemed fitting that we celebrate with a Golf Themed Birthday Party.


I kept the menu simple with his favorite foods; fried chicken, pasta, sandwiches, chips and salad.
For fun… I used golf lingo to create little signs to label some of the food.
I used “free golf clipart” that I found online and customized each sign using a free photo editing site. 


To clip the signs onto the serving dishes I used... 


Of course… there was the Water Hole and a Arnold Palmer Station.


Make a signature Arnold Palmer drink of lemonade and iced tea.
I used a 4" x 6" clear acrylic craft frame for my "Arnold Palmer Station" sign.


I used a mini 3" x 4" sign holder for my "grab your club" sign.


I easily hung this large 5' golf banner on the wall using the sign & banner hangers.


I had so much fun planning this special “Par-Tee” for my husband. It was easy thanks to a little help from Deflecto Craft Solutions.


For more from Sue visit her blog at www.sueeldred.com

Friday, February 3, 2017

Give A Little Love This Valentine's Day!

Hello, Marilyn here today! Deflecto clear acrylic craft frames are a blank canvas. They are extremely versatile to be decorated and embellished and used as decor and/or signage for special events. With Valentine's Day around the corner; I made this one into a wet-erase sign that can be used over and over with whatever you would like to write on it!

Materials:

jewelry findings: round rhinestone frame with jump ring; 1/4" silver jump ring
trim: faux rhinestone trim with self adhesive back
paper punch: 1" round
dimensional medium: (Mod Podge Dimensional Magic)
cardstock: pink, black, vintage white with black writing
adhesives
paper trimmer
scissors
ink to chalk the paper edges
Instructions:

1. The frame will lay at an angle with the "bottom" as the top and the "top" as the bottom. Cut the paper and adhere the layers as shown. All of the paper will be on the inside of the frame, between the front and back panels.

2. Remove the release paper from the banner hanger and attach to the top of the frame as shown.

3. Apply one drop of the dimensional medium to the inside of the jeweled frame. Press the paper circle into the frame and hold down until it is flat. Let dry in place. Apply more dimensional medium to the inner circle and allow to dry flat.

4. Attach the jeweled frame charm to the large jump ring and then attach the jump ring to the banner hanger as shown. 

5. Marker: Bend the sign dangler around the marker. Remove the pen and make sure the ends will fit between the panels of the frame. Remove the release paper from the dangler ends and adhere to the inside panels of the frame. Embellish: Cut a single strand of faux rhinestone trim and adhere it around the sign dangler as shown. Re-insert the marker into the pen holder that you just made.

6. Write on the outside of the frame with the wet erase marker. The writing can be removed with a baby wipe or with a wet paper towel. 

7. Since Valentine's Day is just around the corner; I wanted this one to be fitting with the holiday. Use your imagination and embellish the frame any way you like, to fit with your decor at home or office. 

Enjoy!

Make sure to take time to enjoy the small blessings along the way, and
Live Life with a Flourish!


Thursday, November 3, 2016

Get A Jump Start On Your Thanksgiving Decor

Hello, everyone Nadine here today! Have you ever had an event or a party and needed a way to display a bunch of signs and hang banners? Well, Deflecto has all the perfect solutions, and on November 28th Create and Craft will be featuring Deflecto’s new Event Kit that will have several of the products I used for my Thanksgiving celebration decor. You are not going to want to miss out on these kits! Click HERE to find where to watch!


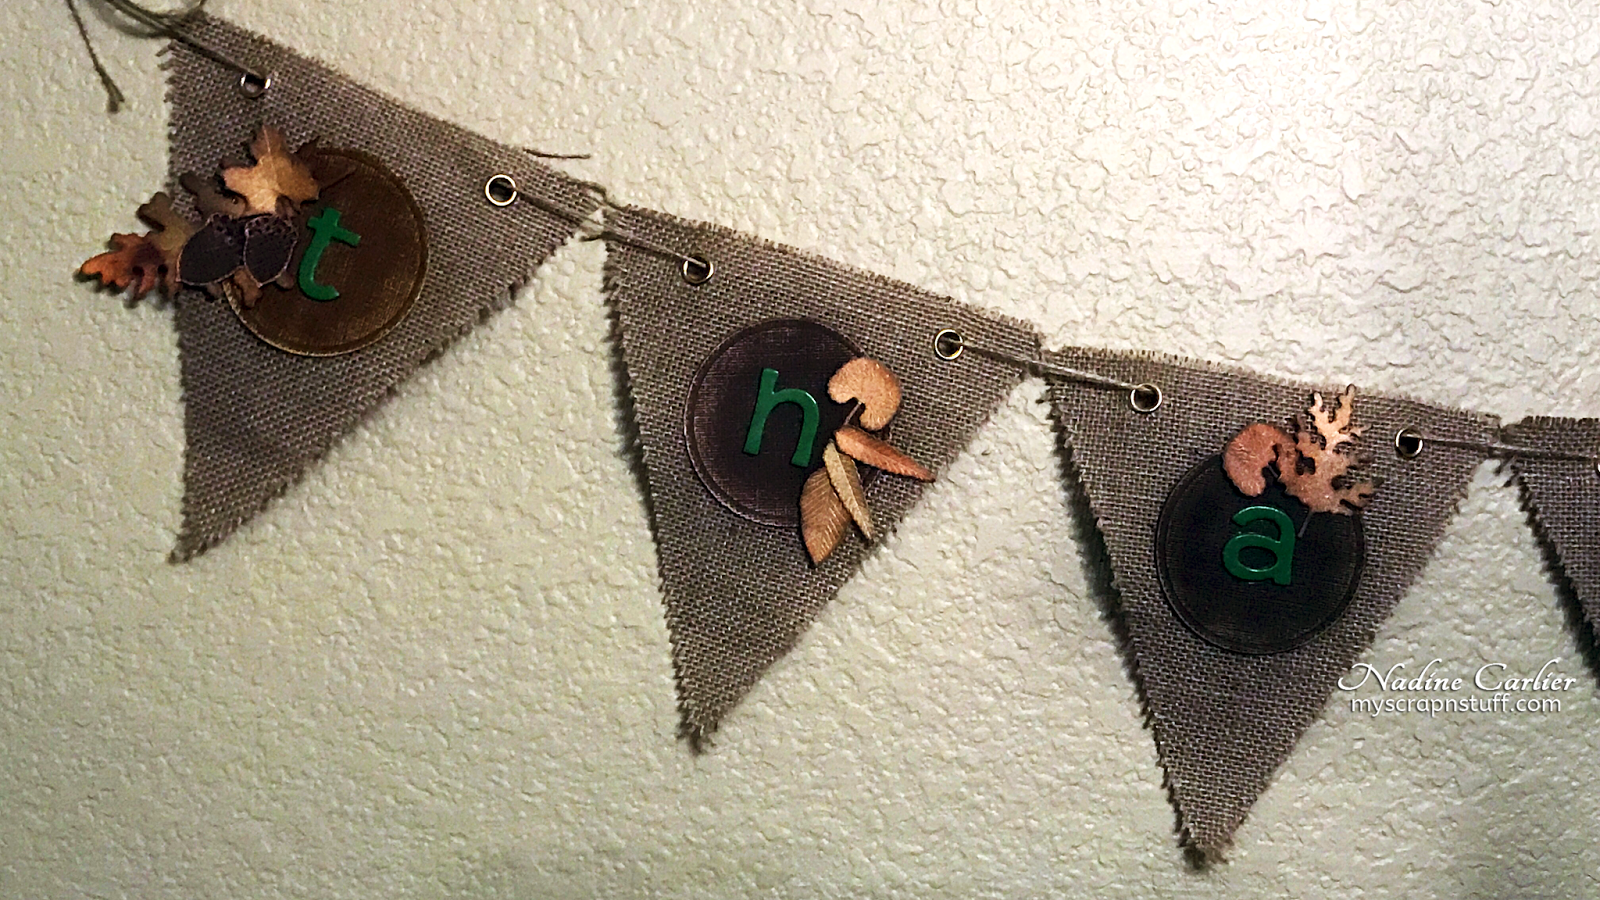
I made a burlap "Thankful" banner and hung it on the wall with Deflecto's Sign & Banner Hangers. No need to worry about them ruining your paint, the adhesives are removable.


 The 3 Tier Dessert Stand can be used to display cupcakes, pastries, cake pops and so much more. Since I haven't made any treats yet for Thanksgiving to display on it, I thought I would turn it into a pretty centerpiece. Just adhere some thin strips of fall colored paper to the edges of each level of the tiers. Then add some fall garland and some mini pumpkins and viola, super easy centerpiece!


On the top of the 3 Tier Dessert Stand, I attached a Happy Thanksgiving sign that I found on the internet and just printed out on some cardstock. To attached the sign I used a VersaGrip Wide Double Clips.


I also made some little name seating signs using the 1 ½" x 2" Mini Sign Holder Frames. Information on how I created these and a tutorial video will be posted soon.


Thank you for visiting and make sure to come back again for even more inspiration. Also, check out the sneak peek below of the Event Kit that Create and Craft will be featuring on November 28th.


Saturday, August 6, 2016

Mad Hatter's Tea Party Banner

Hi, everyone! Down the rabbit hole, we went for a Mad Hatter's Tea Party Bridal Shower! Above the doors that led out to the party hung a fun themed garland using Deflecto's Flexible Pouches. After the shower; the garland can be taken apart to make a keepsake album for the bride to be!


Papers were cut to fit inside the pouches.  I layered cut-out embellishments with photographs like for a scrapbook page and inserted it in the pouch.  I die cut scalloped circles of different sizes and cut each circle in two.  Scalloped decoration:  Adhere the paper layers together and then adhere to the top of the pouch.
The gold glitter letters are self adhesive, and I adhered them to the outside of the pouch after inserting the layered papers inside the pouch.
Deflecto products you will need:

Flexible Pouches - 5" x 7" #20020CR

Attach the Sign and Banner Hangers to the backs of the pouches.  Thread ribbon or jute string through the loops to hang the banner.

Hope you got some inspiration here today.  We hung this banner over the door at the bridal shower, and it led out into the yard which we had decorated with the theme.  All had a great time!  Here is another glimpse at the decorations outside the door!


Thanks for coming down the rabbit hole with us for a glimpse into the bridal shower.  Hope you got some inspiration here today.  The wedding is coming soon, and it is all DIY as well!  We are using a lot of Deflecto products for wedding signage and more.  

Make sure to take time to enjoy the small blessings along the way and
Live Life with a Flourish!


Make sure to follow Deflecto Crafts on Pinterest and Facebook for more inspiration!

Thursday, July 28, 2016

A Wedding "Tied the Knot" Banner!

We are looking forward to our daughter's wedding this Summer. I have the perfect embroidered letters for the banner sentiment! Follow along and I will show you how I made it!


You will need:

Sign/banner hangers:  1 for each rosette  (Deflecto #20003CR)
JOY Letters:  3" tall alphabet letters to spell:  TIED THE KNOT
cardstock:  fifteen 12" x 12" sheets of teal & black double-sided (core'dinations)
ribbon:  2-1/2" gold wire edged; 1-1/2" sheer vintage white (3 yards of each)
paper trimmer
paper scorer
die-cut machine
die for scalloped circle
punch or die-cut for 2" circle, 1" circle
glue gun
jute string
scissors


Instructions:

1.  Score one 12" piece of cardstock at 1/2" intervals.  Score across the entire sheet.

2.  With the score marks going up and down; cut out four 3" x 12" rectangles from the paper.

3.  Fold the score lines back and forth like for a fan.  Repeat for all 4 pieces.

4.  Match the ends and glue together with the same color facing up.


5.  For each rosette:  When all sides are glued together/ lay the rosette flat and push it together until there is about a 1" hole in the center.  It can be tricky trying to hold it all together, but you can do it!  Apply hot glue around the opening.  Adhere one 2" circle to cover the hole.  Repeat on the opposite side.  Make sure everything is centered properly.  Make enough rosettes for each letter of your sentiment.  This design took 11 rosettes.

6.  For this banner; the colored rosettes are staggered; one teal next to one black, then repeated.
Reverse the 4" scallop circles and adhere black to teal, then glue the teal to a black rosette.  Refer to the photo given for this step.

7.  Lay the rosettes flat, rotating the colors; one next to the other.  Remove the adhesive from the back of one 3" Joy letter and adhere it to the 4" scalloped circle on the first rosette.  Be sure to spell everything correctly!  Repeat for each letter.


8.  To hang the banner:  Lay one rosette with the letter facing up if you are reading it.  Flip the rosette over and adhere a 1" circle of cardstock where the hanger will go.  Make sure it is centered with the middle of the letter on the opposite side and will hang straight when you thread it onto the jute.  Apply the adhesive to the back of one hanger and adhere the hanger to the 1" circle as shown.  Make sure the hole in the hanger is in the right position....going the right direction.  Repeat for each rosette.


9.  Once step 8 is accomplished; measure the jute string for the length you will need and double.  Thread two strands of the 3-ply jute string through the eye of each hanger.  **Designer note:  If you do not have the hangers.....space your rosettes evenly; right side facing up and glue the string between the rosette and another cardstock circle on the back.  It will be important to make sure everything is hanging at the appropriate angle for all of the letters to be straight.

10.  Tie a loop in each end of the jute so you can hang the banner.

11.  To finish:  Cut the ribbons in 8" lengths.  Tie 4 ribbons between each word and at each end of the banner.  Now it is ready to decorate your party!

**Designer note:  You can reduce the size of your rosettes by cutting them in 2" strips instead of 3" strips.  You can also use 3 strips of the scored cardstock for each rosette.  This will make the rosette a little lighter in weight.


Make sure to follow Deflecto Crafts on Pinterest and Facebook for more inspiration!

Thank you for stopping by!  I love getting comments and questions.
Live Life with a Flourish!

Monday, March 21, 2016

Burlap Easter Wreath with Video Tutorial

Erin, here today and I have always wanted to create a spring wreath, and I finally got around to doing it, and it came out so cute!! I really wanted to use up the scrapbook supplies I already had, to create something a little different something other than a traditional scrapbook layout. The wreath just seemed like the perfect thing to use them on.


I used the Sign & Banner Hangers on the back of the banner to hold it in place on the wreath.


Here is an in-depth video tutorial on how I made this super cute wreath.


Deflecto products are available through local art, craft and educational stores, in addition to online retailers such as Amazon.com, Scrapbooking.com and Scrapbooking Made Simple. To find a local retailer, click HERE and enter your zip code to see where you can purchase Deflecto Craft products near you.

Supplies Used

Sign & Banner Hangers - Deflecto
Metal Wreath Base
Fabric/Burlap - Canvas Corp Brands
Rope - Canvas Corp Brands
Mist - Tattered Angels
Chipboard - Bella Blvd
Bows - Bella Blvd
Paper - Bella Blvd
Stickers - Bella Blvd
Ink - Prima
Plastic Eggs
Glue - Beacon

Enjoy!

Related Posts Plugin for WordPress, Blogger...