Showing posts with label Pear Clips. Show all posts

Thursday, July 27, 2017

Guest Room Closet Make-Over.


The closet in my Guest Room has been abused and neglected for years. 
I'm blaming the kids, but truth be told, I may have had a small part in it myself.
Because I'm always needing more storage for my ever expanding crafting supplies, I decided to take over the closet for myself.
After clearing everything out, I purchased a large cubby/bookcase from Ikea and treated myself to some nice fabric bins from Target.


To help keep me organized...
I labeled each bin using Small Flexible Pouches and hung them on the bins with Pear Clips.
Everything’s neatly contained and it looks pretty.


Besides all the extra craft storage…
I now have room for finished albums, my camera bag and more.


You may have noticed there are still a few toys left in the closet. (always a work in progress)
I used the Deflecto Rotating Carousel Organizer for Lego storage. (the boys love it)
You can see more of the Guest Room Closet Make-Over here.

Friday, July 21, 2017

Patriotic Mini-Album


If you took lots of photos this July 4th, you need this fun mini-album!

Made with Deflecto's large flexible pouches and pear clips and just a couple of sheets of paper, this album is small in size, but big on Fourth of July fun!

Materials:

  • white and blue cardstock
  • patterned paper in patriotic colors 
  • July 4th-themed stickers 
  • red, white, and blue buttons (various sizes)
  • tape runner
  • adhesive dots
  • adhesive foam squares
  • scissors
  • paper trimmer
  • ribbon
  • Deflecto large flexible pouches 
  • Deflecto pear clip
How to:
  1. Using a paper trimmer, cut 5 pieces of white cardstock to 5" x 7".
  2. Using patterned paper and blue cardstock, create layouts on both the front and back of each piece of white cardstock. 
  3. Embellish each page with stickers and buttons. Use foam squares to "pop up' some of the stickers to give your page dimension. Attach buttons using adhesive dots.
  4. Once all pages have been completed, place each page into the pouches.
  5. Use a pear clip as a ring to hold the pouches together in an album.
  6. Cut 6" lengths of ribbon. Tie around the pear clip. 


Tuesday, July 18, 2017

Bridal Shower Mini Albums with Deflecto Vinyl Pouches

Summer greetings!  Many bridal showers and weddings are happening this time of year!  My daughter got married last Summer, and we had a bridal shower for her last July! I had lots of pictures to share and wanted to make a gift of a mini photo album for family and friends who were involved in the shower and wedding.  Deflecto flexible pouches are the perfect solution to keeping the photos pristine through a lot of handling.  I will show you how I made my mini albums below.  


You will need:

Deflecto:  Flexible Pouches 5" x 7" #20020CR; 3" x 5" #20019CR
Deflecto:  Pear Clip, 2-1/2" #20012CR (one for each album)

12 x 12" Memory Papers:  Contrasting papers of the same color family
Vinyl for lettering:  Colors of your choosing
Vinyl transfer paper
Paper Trimmer
Adhesives
Ribbons:  Colors of your choosing
Scissors
Die-cutting machine


Directions:

First, select your photos and make sure they are sized small enough to mat and apply to the background paper with plenty of area around each photo.

Select colors of solid and patterned papers that will coordinate throughout the mini album.  I used a 12" x 12" paper pad, and they had already coordinated the papers!

Create a background for your page. Cut slightly smaller than 5" x 7" paper for your background page. Cut a mat paper slightly larger than the photo.  A double mat can be applied to the focal point photo if you prefer.

Check your layout but do not apply adhesive until you have placed the photos.  Dry placing the photos before applying adhesive is a sure way to get them the way you like them before adhering them to the page.

Working from the front of the album; right side up; you will need to reverse the position of each scrapbook page on the back or reverse side of each page.  I arranged each page and then inserted into the front and back of each pouch.

After completing all of the album pages; put them in a pile with all of the edges matching.  Cut a 4" x 7" piece of adhesive vinyl.  Adhere it to the top edges' front and back to "bind" the pages together.

Punch a hole in the vinyl matching to the holes in the stack of pouches.  Attach the pear clip.

Cut and tie ribbons to the pear clip.  One ribbon or ten!  Up to you! Trim the ribbon tails at an angle.


Cut a vinyl monogram B and adhere it to the front of the 3" x 5" pouch.
Cut the word Bride from another color of vinyl and adhere to the top of the B as shown.
I recommend cutting the letter and word from memory paper first to make sure it is the right size and fits on top of the pouch.


BONUS!


I made a mini album using the 3" x 5" pouches.  I used the same technique as shown above.  My daughter has a long haired dachshund named "Riley."  This mini album was dedicated to her. 


Below is a picture of Riley all decked out for the 4th of July!   


Thanks for stopping by!


Make sure to take time to enjoy the small blessings along the way and;

Live Life with a Flourish!

Marilyn

Friday, July 14, 2017

DIY Easy Luggage Tags

Hello! Nadine here today sharing some super easy luggage tags I created for a family vacation we are going on soon.  I used Deflecto's Flexible Pouches and simply slipped in some scrap paper pieces into the pouches and wrote our names, addresses and phone numbers on them.  You can customize them to however you like. I have made these before but with a cruise theme.

Once you have them decorated the way you like, all you have to do is attached them to your luggage with Deflecto's Pear Clips, and you are ready to go!


Thank you for stopping by and hope I inspired you to create your own luggage tags for your next vacation.


Tuesday, July 11, 2017

Creative Storage


Hi, crafters! Team member Monica here sharing an innovative use for your Deflecto Craft: 


I stuck the Sign Hangers on the outer edge of my table which sits at a sort of slant and added the Pear Clips to serve as a holder for my Fun Flock. I am one of those types of crafters that believe in "out of sight, out of mind." So, seeing my flock will encourage me to actually use it. I also used it to hold me enamel dots, and the hangers are so strong that you don't have to worry about if falling on the floor and you can sort of flip through your colors because the hangers sort of swivel. 


Here they are at an angle. I also used these to organize my parents million prescriptions. They regularly stored them in a basket now they are all perfectly lined up where they can see what they have. MY flock is so much prettier than a bunch of pill bottles, so I felt this was a better picture to show lol....


I hope everyone enjoyed my post and be sure to grab a bunch of these because the possibilities are endless!!! Happy Organizing...

Thursday, July 6, 2017

Die Cut Organization

Hello, crafty friends! Martha Lucia here to share with you the easiest and practical way to organize all your die cuts and see exactly what you have and keep them all in one place after each use. It's a simple and practical solution, take a look:


On this project, I used three different Deflecto products, the Pear Clip to tie all the Flexible Pouches (7-3/8"x6") that I used to storage and carry my different die cuts. To keep all the die cuts in place, I used Magnetic Craft Sheets, and the best part is that I can used both sides of the pouch and the magnets.


For one side, I decorated the border of pouch with different colors of washi tape to identify the type of die cut that is inside. And for the back side of the washi tape I added a piece of card stock with the category of the die cuts. I have single die cuts, borders, tags, elements, molds, animals, etc., and all are from different brands or manufactures.


I definitely love the transparency of all Deflecto organization products, since it is very easy to know what we have and see through it as well as keeping control of things and making sure everything is organized.


Another advantage that I found on these Flexible Pouches is that the closing border lets you secure the magnet sheet and keep it inside of the pocket without worrying that the content will slip out of the pouch. In other words, it is secure for the small or large pieces if you are running and forgot to secure the die cut over the magnetic sheet.

These Flexible Pouch came in two sizes, for this organization project I used large size (7-3/8"x6"), but then I will show a creative project with the Flexible Pouch 3"x5" that I am sure you will love! Super easy, practical and useful! What do you think?

I would love to hear from you. See you soon!!!

Tuesday, August 30, 2016

Luggage Tags For The Newlyweds!

The bride and groom are off on their honeymoon! Whether they travel by car, bus, train or plane; they might get some special service by sporting these fun tags on their luggage!

Here is what you will need:

Deflecto 3"x 5" flexible pouch #20019CR (one each); pear clip #20012CR

JOY 1" high embroidered letters by the sheet: pink and black

scrapbook papers: black and white stripe

cardstock: black, teal, white

glitter tape: 1/2" wide gold

paper flowers: 3/4" teal; 1/4" dark pink

ribbon scraps: white sheer, teal satin, white satin, teal polyester

adhesives

scissors

paper trimmer


Instructions:

1. Cut the striped paper to fit in the pouch. Cut, layer and adhere the other papers to the striped paper as shown. Place inside the pouch.

2. Adhere the letters to the outside of the pouch using a strong glue meant to hold on plastic. I used a dimensional medium. Allow to dry.

3. Embellish with flowers and glitter tape. Ribbons: Cut and fold the ribbons in the middle. Push the middle of the ribbons through the hole in the pouch; make a loop. Pull the ribbon tails through the loop and close the loop. Trim the ribbon tails at an angle.

4. Finish: Open the pear clip and attach it to the pouch through the same hole as the ribbons. Close the clip. Ready for the honeymoon!

I hope you got some inspiration here today. I always like questions and comments. They can be left below.

Make sure to follow Deflecto Crafts on Pinterest and Facebook for more inspiration!


Saturday, August 6, 2016

Mad Hatter's Tea Party Banner

Hi, everyone! Down the rabbit hole, we went for a Mad Hatter's Tea Party Bridal Shower! Above the doors that led out to the party hung a fun themed garland using Deflecto's Flexible Pouches. After the shower; the garland can be taken apart to make a keepsake album for the bride to be!


Papers were cut to fit inside the pouches.  I layered cut-out embellishments with photographs like for a scrapbook page and inserted it in the pouch.  I die cut scalloped circles of different sizes and cut each circle in two.  Scalloped decoration:  Adhere the paper layers together and then adhere to the top of the pouch.
The gold glitter letters are self adhesive, and I adhered them to the outside of the pouch after inserting the layered papers inside the pouch.
Deflecto products you will need:

Flexible Pouches - 5" x 7" #20020CR

Attach the Sign and Banner Hangers to the backs of the pouches.  Thread ribbon or jute string through the loops to hang the banner.

Hope you got some inspiration here today.  We hung this banner over the door at the bridal shower, and it led out into the yard which we had decorated with the theme.  All had a great time!  Here is another glimpse at the decorations outside the door!


Thanks for coming down the rabbit hole with us for a glimpse into the bridal shower.  Hope you got some inspiration here today.  The wedding is coming soon, and it is all DIY as well!  We are using a lot of Deflecto products for wedding signage and more.  

Make sure to take time to enjoy the small blessings along the way and
Live Life with a Flourish!


Make sure to follow Deflecto Crafts on Pinterest and Facebook for more inspiration!

Friday, August 5, 2016

Easy DIY Personalized Luggage Tags

Hello, Nadine here!
Have you ever got off an airplane and then gone to the luggage pick-up area and then can't figure out which luggage is yours since so many of them all look alike? Me too! 

So I decided to make some fun luggage tags that can be personalized to your own style using Deflectos Flexible Pouches and Pear Clips


Watch the short video below on how I made them...


Make sure to follow Deflecto Crafts on Pinterest and Facebook for more inspiration!

Friday, July 29, 2016

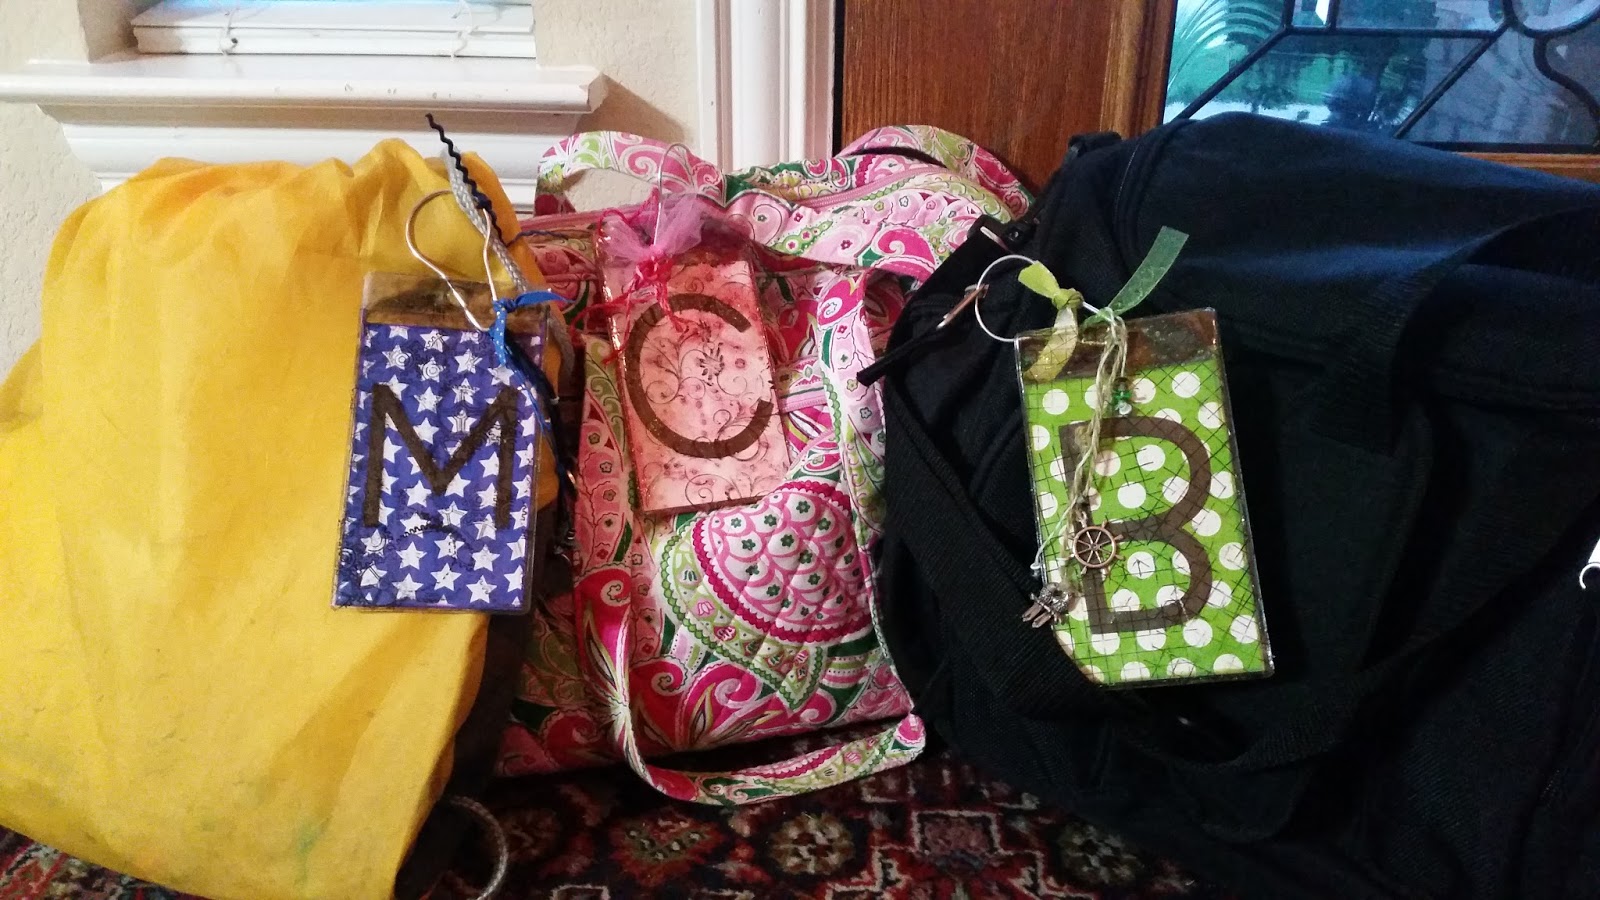
DIY Bag Tags

I thought it would be fun for my kids to have tags for their bags when we travel and also for school, so I made some bag tags, but I had to do them up mixed media style.


Here is a detailed video on how I made these fun tags for my kids.


I used the first name initial of each of the kids names for the large letter on the tag help identify which was which, and then picked their favorite color for the papers, ribbons, and embellishments.  I placed them all in the Deflecto plastic pouch with the pear clip to attach to the bag.

Deflecto Pouches and Clips
 Here are some up close pictures of the project and on the bags.


So now my kids have fun clips to place on their bags to claim them as theirs!!

Supplies:
Flexible Pouches
Pear Clips
Papers - Canvas Corp
Paint - Tattered Angels & Recollections
Cutter - Fiskars & Circuit
Ribbon - May Arts
Charms - 7 Gypsies & Other
Stamp - Deep Red Stamps
Ink - Imagine Crafts
Eyelets - Eyelet Outlet
Sticker Maker - Xyron
Glue - Beacon

Make sure to follow Deflecto Crafts on Pinterest and Facebook for more inspiration!

Enjoy!

Monday, July 18, 2016

Beach Themed Mini-Album

Who says you have to do a full 12x12 album for your beach vacation? A mini-album shares your favorite photos and is a fast way to get those pictures off your phone and ready to share. And the fastest way that I know to make a mini-album is by using Deflecto 3"x5" flexible pouchesDeflecto pear clips, and mini-collections from Keller's Creations!


This 10 page beach-themed mini-album was made in about 30 minutes, and it uses the "Alisha's Beach House" mini-collection. That's two full sheets of 12x12 paper, one sheet of 6x12 paper, an alphabet sheet, and four embellishment sheets, and I had lots left over! These mini-collections are fantastic because the 12x12 double-sided printed paper is divided into 6x6 quadrants. This gives you a ton of options on how to cut and combine the papers. All I added was white scrap paper, a couple of brads, blue ink, and some ribbon -- all supplies I already had in my stash. 

The album is the perfect size for Instagram photos or photos using those adorable little Instax cameras. Plus, you can easily throw it in a purse so you can share it with all of your jealous co-workers when you return from your beach getaway!


Make sure to follow Deflecto Crafts on Pinterest and Facebook for more inspiration!

Happy Crafting!
Related Posts Plugin for WordPress, Blogger...