Friday, October 30, 2020

DIY Thanksgiving Ribbon Turkey Decoration

Add a little fun and whimsy this Thanksgiving with this Quick and Easy Ribbon Turkey Decoration.

Featured Storage:  Deflecto Ribbon Dispenser and Deflecto Stackable Caddy Organizer

Materials Needed:

  • Felt Pieces:  Brown, Red, and Yellow
  • Assorted Ribbon
  • Googly Eyes
  • Scissors
  • Hot Glue Gun or Craft Glue
  • Clothespin
  • Cardstock
  • Permanent Marker
  • Ruler

Directions:
  • Draw a simple turkey body, beak, and wobbler on the cardstock to create a pattern.   
  • Or, you can download, print, and cut Design Team Member Beth Watson's turkey pattern here.
  • Trace pattern pieces onto the felt and cut out.  (Cut two turkey bodies)
  • Glue googly eyes, beak, and wobbler onto the turkey body.


  • Measure and cut six-inch lengths of rainbow-colored ribbon from your craft stash. Fold each piece of ribbon into a loop and secure at the ends with a glue gun and glue sticks. For each turkey, you will need 10-12 loops of ribbon.


  • Line up the loops in the color pattern that you prefer.  Attach each rainbow ribbon loop to the back piece of the turkey body with a glue gun and glue sticks. Measure and cut two lengths of yellow ribbon six inches long, tie a not near one end, and then cut out a triangle notch to resemble the turkey legs. Glue to the bottom of the body of the turkey.

  • Glue the front piece of the turkey onto the back, which will cover all of the ribbon ends. Attach a wooden spring-style clothespin to the back center of the turkey with a glue gun with the clip end pointing up.

Ribbon Turkey Decorations make Great Place Cards for your Thanksgiving Table.  

Cut a strip of cardstock 3/4″ in width, hand letter your name onto the strip with a Permanent Marker, and then clip into the clothespin. The wooden clothespin acts as a stand for the turkey to sit and a clip to hold the names as place cards.

The Ribbon Turkey Decoration was designed by Beth Watson.  
For more great projects visit Beth's blog here.


Share your projects and ideas using #DeflectoAtHome #DeflectoCrafts

Friday, October 16, 2020

Easy Sun Catcher Kids Craft


Easy Sun Catcher Kids Craft.

Keep the kids busy with a fun and easy craft with virtually no mess.

Featured Storage: Deflecto Caddy Storage Tray


Supplies Needed:

  • Black Die Cut Outlined Shapes
  • Variety of Colored Tissue Paper
  • Clear Contact Paper
  • Scissors

Directions:
  1. Cut tissue paper into small squares.
  2. Cut a piece of clear contact paper slightly bigger than the black outlined shapes.
  3. Place shape onto the clear contact paper.
  4. Randomly place tissue paper over the design until the entire design is covered.
  5. Cut around design with scissors.

The Stained Glass Tissue Paper Art was created by Design Team Member Erin Reed. For more fun projects from Erin you can visit her blog here.

               Share your projects and ideas using #DeflectoAtHome #DeflectoCrafts

Monday, October 12, 2020

Organizing Holiday Craft Supplies


Christmas Crafting Organization Tips…

It’s that time of year when thoughts are leaning towards the Holidays.  For many, the Holidays are a favorite time of year to do craft projects.  There’s so much crafting, creating, gifting, and sharing to do.  Let's get started.

For a little inspiration, Design Team Member Sue Eldred shares with us how she organizes her craft supplies for the Ultimate Holiday Crafting Season.


To prepare for the busy season ahead, transition your space with all your favorite Christmas Crafting Supplies conveniently close.  Mix a little old with the new to make it personal.  


Featured Storage:

Sue used the Deflecto Interlocking Tilt Bins to keep jingle bells, small wood embellishments, paints, bottle brush trees, all neatly organized and easily accessible.


Sue says..."I use a lot of ribbon during the Holidays.  I use the Ribbon Dispenser that fits into the large section of the Stackable Caddy Organizer and add all my favorite holiday ribbon rolls. As you can see, it holds several. The small and medium containers hold my glue guns and adhesives.  The Stackable Caddy is great for grab and go crafting."


The Deflecto Caddy Storage Tray is perfect for holding floral embellishments and beads.  It fits nicely into the large compartment of the Deflecto Stackable Caddy.

Use the Deflecto Stackable Open Cube to hold Holiday Dies and Stamp Sets. It’s also a great place to stash cut cardstock ready to be folded into cards.


The Deflecto Interlocking Marker Organizer is not only great for holding markers it's also great for holding paintbrushes, scissors, pens, and pencils. It looks great and keeps everything neat and tidy. (and…it fits nicely into the stackable caddy)


When working on cards, it’s great to have markers organized and close at hand. You can unfold the Expandable Marker Accordion into several different configurations.  It’s a perfect companion to have on your desk.

Update your Holiday Craft Space and enjoy the difference it makes.

Share your projects and ideas using #DeflectoAtHome #DeflectoCrafts

Thursday, October 8, 2020

Colorful Tie Dye Birthday Party


What's more fun than a Colorful Tie Dyed Themed Birthday Party?

When you're a young pre-teen, you want a birthday party that is fun and colorful and what's more colorful than tie-dye.

Featured Storage:  Deflecto 3-Tier Dessert Stand

The icing on the cupcake is the Deflecto 3-Tier Dessert Stand, which is easy to assemble and then flattens for storage.


The Deflecto 3-Tier Dessert Stand is quick to assemble in four easy steps.  It's made of durable and washable clear acrylic and even has holes around the tiers for cake pops or lollipops.  And each tier has a 1/4" edge that makes customizing a breeze!

To decorate the dessert stand, we cut tie-dye paper into 1/4" wide strips using a paper trimmer and attached them with a tape roller.

Did somebody say cupcakes?  Yes, please.

The Tie-Dye Themed Birthday Party was created by Design Team Member Beth Watson. For more tie-dye party ideas visit Beth's Blog here.


Share your projects and ideas with use using #DeflectoAtHome #DeflectoCrafts

Monday, September 28, 2020

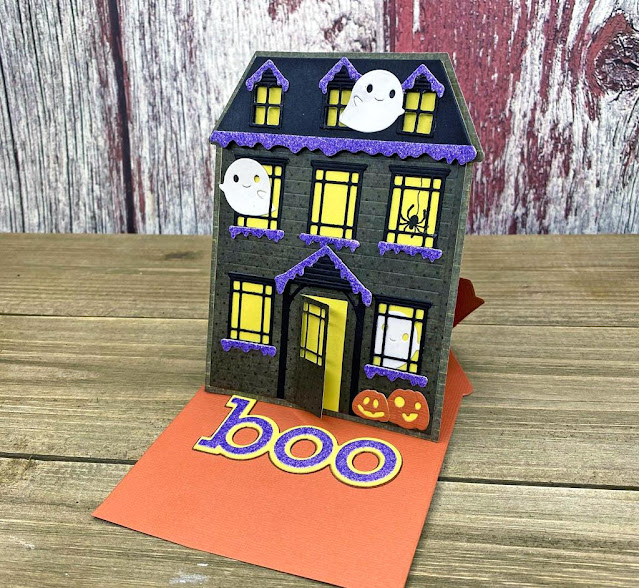
Halloween Haunted House


Halloween Haunted House Easel Card and Die Storage.

We love this adorable Haunted House created by Design Team Member Nadine Carlier.  

If you're a card maker like Nadine, chances are you have a collection of thin metal dies.  

To create the card, all the pieces of the Haunted House are die-cut using the thin metal dies and put together using adhesive.   

Featured Storage:  Deflecto Open Stackable Cube Organizer 

For her die storage, Nadine uses the Deflecto Stackable Cube Organizer to hold all her die sets upright. The organizer makes it easy to find the exact dies she needs.

There are several different styles of Cube Organizers.  A great way to customize the perfect storage.

The cube fits neatly on a shelf and makes finding the right dies at your fingertips.  

Keep your workspace clutter-free and your supplies close at hand.

You can read more about Nadine's Halloween Haunted Easel Card on her blog.

Share your projects and ideas with us using #DeflectoAtHome #DeflectoCrafts.

Monday, September 21, 2020

Throwing a Mermaid Party


 A good party all starts with the cake, or in this case, the CUPCAKES!

Design team member Erin Reed recently threw her daughter a Mermaid themed birthday party. Her daughter wanted to make fancy cupcakes with mermaid tails and sea stars on them and cute sprinkles, so the theme all revolved around this idea of bubbles and mermaid tails.


Erin used the 3-Tier Desert Stand for the cupcakes. It fit great with the theme and was so easy to put together.


Erin wanted to dress up the cupcake stand a bit, so she grabbed some washi tape to match from her Small Three-Drawer Organizer.


Fun homemade party picks and lots of yummy sprinkles helped make this party special. Erin's daughter had such a blast, and she says it was the best party ever!

You can see more of Erin's Mermaid Party here.

Share your projects and ideas with us using #DeflectoAtHome #DeflectoCrafts.

Friday, September 11, 2020

Buffalo Plaid Wood Slice Pumpkin

How to Make a Buffalo Plaid Wood Slice Pumpkin

Nothing says "Warm and Cozy Fall" like Buffalo Plaid and Pumpkins.  

Add them together for a cute Fall Home Décor project.


Featured Storage:

Materials Used:

  • 7″-8″ Unfinished Round Wood Tree Slice
  • Acrylic Paint:  Orange Twist, Off White, Light Gray
  • 1″ Removable Painters Tape 
  • Paintbrush
  • Fine Grit Sandpaper or Extra Fine Grit Sanding Sponge
  • Hot Glue Gun
  • Small “Home” Wood Word
  • Raffia, Ribbon, Button, and Twine

Directions:

  • Paint the inside of the wood slice with orange acrylic paint. Leave the outer bark showing.

  • Add strips of painter’s tape onto the wood slice to make stripes.  Rub your finger over the tape to make sure that the tape is securely on the wood and has no gaps.
  • Paint inside the stripes with a thin coat of off white acrylic paint.  Be careful not to apply the paint too thick.   Only one thin coat of paint is needed.
  • Remove painter’s tape.
  • Allow paint to fully dry before continuing to the next step.

  • Rotate the frame 180° and apply the tape in the opposite direction. Make sure the tape is securely down.
  • Paint additional stripes with a light coat of light gray acrylic paint.

  • Remove the painter’s tape. Allow the paint to dry.
  • Lightly sand the wood slice. Sanding brings out the wood-grain and helps to hide any little imperfections.
  • Wipe with a clean cloth.

  • Cut a small 2″ piece from a tree branch to use for the stem.
  • I also used a “home” wood word picked up at the craft store for my pumpkin.
  • Hot glue the stem onto the top of the pumpkin.  Hot glue the word “Home” on the front of the pumpkin.

  • To give the Pumpkin a little extra support, I hot glued a small wood piece (cut from an old scrabble tray) to the back of the pumpkin.  Because the wood slice is not perfectly round, you may have to offset it a bit.
  • Tie raffia around the stem and hot glue a small button bow with faux fall berries onto the pumpkin
The Buffalo Plaid Wood Slice Pumpkin was created by Design Team Member Sue Eldred.
For more fun projects visit her Sue's blog here.


Share your projects and ideas with us using #DeflectoAtHome #DeflectoCrafts.

Monday, August 31, 2020

Back to School Teacher Gift

Back to School Teacher Gift filled with school supplies is a perfect and thoughtful present.

This year school might look a bit different with in-person and virtual learning options.  Everyone is adjusting as the new school year begins.  It is good to remember to be kind.  The teachers are struggling just as much as the students are, so let’s show them some love!  

Using the Deflecto® Large 3-Drawer Organizer, fill each drawer with school and art supplies that would be perfect for any teacher to share with their students.

Complete the Teacher Gift with FREE Printable Tags by Design Team Member, Beth Watson.

Wrap your gift up with a bow. Tie a black and white gingham ribbon around both sides of the organizer and tie in the center with a bow, and then add the tags with adhesive.

The Deflecto® Large Three-Drawer Organizer is the perfect addition to any classroom.

This Deflecto® Large Three-Drawer Organizer is 13″ by 13″ by 6.5″ for organizing school supplies, scrapbook papers with embellishments, sewing supplies, knitting supplies, and more. The transparent cube allows full visibility to quickly access what you need. Divided drawers keep everything neat and tidy. Compact, stackable design leaves plenty of room on your work table or desk.


Beth say...I can think of so many ways to fill and gift this Three-Drawer Organizer. Pack with k-cups, flavored creamer and sugar to create a coffee station for a friend with a new home. Load with treats, chocolates and candies to create a candy bar at a bridal shower or birthday party. Fill with greeting cards, tissue papers and bows to create a wrapping station for all occasions. The possibilities are endless!

Share your projects and ideas with us using #DeflectoAtHome #DeflectoCrafts on social media.

Friday, August 21, 2020

Fall Scarecrow Craft for Kids


Craft Stick Scarecrows are a fun and easy kids craft project for Fall. 

Featured Storage:  Deflecto Caddy Storage Tray

Materials Used:

  • Craft Sticks
  • Glue
  • Felt (or construction paper)
  • Scissors
  • Small Flowers
  • Googly Eyes
  • Black Marker
  • Start with all the supplies organized into the Deflecto Caddy Storage Tray.  When the kids can see the supplies they will use, it helps make crafting happier and easier.
  • Pull out seven craft sticks (also known as popsicle sticks) and cut one in half - a parent will need to this part. Set up six sticks in a row, stagger them for a little extra interest, and using kids white school glue use the two half sticks to hold the set of 6 together by gluing them perpendicularly. 

Cut felt (or construction paper) into 3 sections in any fall colors you want. 
The section are the following measurements:
  • Square hat top 3 x 3 inches 
  • Bottom hat section 1 x 4 inches 
  • Hat band 3 x 0.5 inches
  • To finish the scarecrow glue on the googly eyes, triangle nose and draw in the mouth.
The Craft Stick Scarecrows were created by Design Team Member Erin Reed.  
For more fun projects check out Erin's blog here.


Share your projects and ideas with us using #DeflectoAtHome #DeflectoCrafts on social media.
Related Posts Plugin for WordPress, Blogger...