Friday, December 29, 2017

Deflecto Designer Spotlight for December 2017


Congratulations to the Deflecto Designers whose blog posts have been chosen for the
month of December. Check out their projects and instructions on the links given below!


Alexandra Stapleton-Smith project:


Jessica Litman project:


Nadine Carlier's project:


Rosie Nunjai project:


Make sure to follow us on Facebook and Pinterest for all of our design teams inspiration.

Saturday, December 23, 2017

It's almost Christmas!

Hi everyone! Rosie here!

I am back with another Deflecto DT project. Wow! 2017 just flew by right? It seems like each year time goes by faster. I love this time around because I get so much inspiration from the festive season. Usually, towards the beginning of November, I start preparing and organizing my Xmas stash closer to reach. I like to have it all or most of it ready for creating my holiday projects. This time, of course, I have the great products from Deflecto to help me achieve this. 
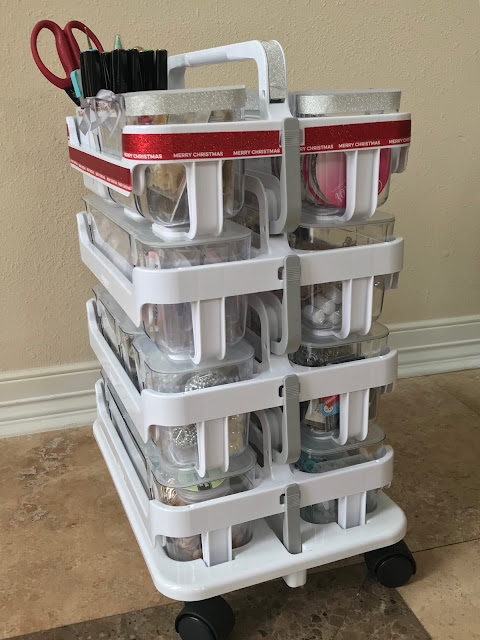
I love the Deflecto Caddy Organizer System. It helps me keep my crafty holiday supplies in one place. I also decided to embellish it a little by adding washi tape to distinguish my Xmas caddy from my other caddies previously owned with other supplies. I like that the caddys is made to stack and move around easily with the Deflecto Caddy Wheel Base.


You can pile as many as you want, I have four and plan on getting more. 


Here is what I used to embellish my Xmas caddy:


Not much is required to give it a festive look right?

I can also remove it easily and put it on my desk.


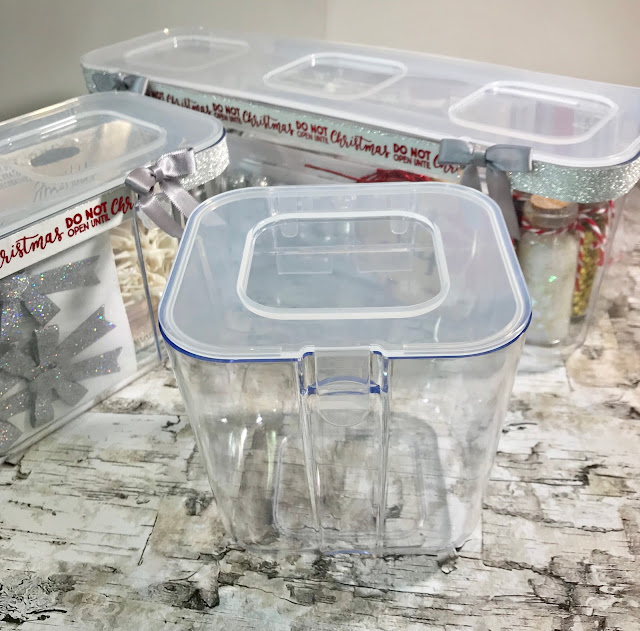
I also decorated every clear container.


On the top and sides too.


I opened the containers so can see there is enough room to store your supplies. 
The containers come in three different sizes.


I decided not to use the smallest container in the caddy and instead add the Interlocking Marker Organizer
This is great to organize your markers and tools.


Here it is! 

Ready for me to craft and start my holiday projects. 
Of course, you can change out your 
supplies according to the holiday or theme!


Thanks for stopping by today! 
I hope you add this to your "Wish List".
I am sure you will love it too. 
Have a wonderful Holiday Season.

Rosie

Tuesday, December 19, 2017

Kids Craft Caddie With Stack N Go

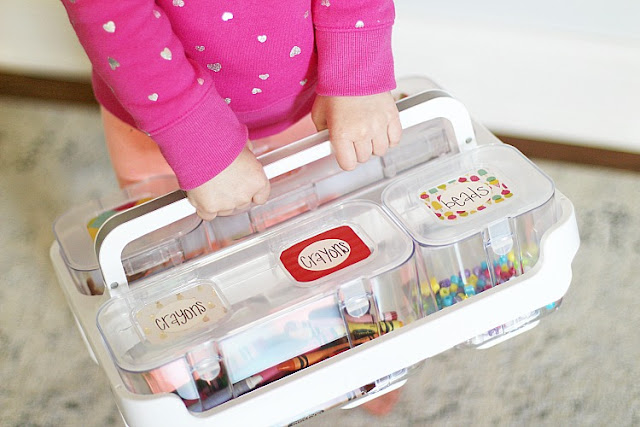
My kids love to craft, but trying to store all their stuff can be rather tricky! That is why I love the Stack N Go Caddies. They can hold a ton of craft supplies, AND the kids can use them without any trouble! So to keep them organized, I added some colorful labels to the tops.


Materials 
Stack N Go Caddy 
DCWV Paper 
Round Hole Punch 
Xyron Creative Station Lite with Repositionable Refills 
Tombow Dual Pen 
Scissors 

Tutorial
Cut DCWV paper to the size of the square on the top of the Stack N Go boxes. 


Punch out the white paper with the 1.5" round hole punch. 
Run the round punches through the Xyron Creative Station with repositionable refills.


Adhere each round punch to the middle of each square. 
Run the square through the Xyron Creative Station with a repositionable refill. I did this so it is easy to switch out labels when the kids want to change what is stored in each bin.


Using the Tombow pen, write what goes into each box within the circle. 
Adhere each label to the lid of the Stack N Go Caddy.


Fill with goodies. 
Enjoy!


For extra fun, you can add the wheelbase so the kiddos can easily store their crafting supplies under their desk or out of the way! For more organizing tips, head over to my blog, The Organized Mama!

Friday, December 15, 2017

Buffalo Plaid Christmas Frame


My entire family thinks of me whenever they see red buffalo plaid…

I’m not sure why?
But seriously… what’s not to love?


To make my Very Merry Christmas Frame…

I picked up a few sheets of the Simple Stories Very Merry line of scrapbook paper
from my local Scrapbook Store. Along with a few embellishments and a
Deflecto Clear Frame, 8″ x 10″ (597901CR)

I made a cute and simple Very Merry Christmas frame.
If I decide to change the look next year, I have a great start to an awesome scrapbook layout.


Tuesday, December 12, 2017

Snowman Factory with Deflecto Stackable Caddy Organizer

December Greetings Friends! As I write this blog, I am looking around at my stacks and piles of Christmas decorations as I finish up some projects and look forward to decorating the house. Deflecto has come up with a Stackable Caddy storage system that is a favorite of everyone! The caddies are made to Stack'N Go with a Caddy Wheel Base. You can pile on as many as you desire for convenient storage.

I decided to dedicate one of my caddy's to a festive storage for the snowman ornaments I make for the holidays. I put the foam balls, paints, paintbrushes and accessories in the storage bins for convenience when I work on this project.

Read on, and I will tell you about how I decorated the caddy!
You will need:


Paints: Metallic Gold Acrylics (Designer note: Spray paint works great too)

Sponge: I used a sea sponge

Paintbrushes

Vinyl with adhesive: Metallic Gold and Clear Glitter

Die-cut machine

Water Bucket

Paper Plates

Paper Towels

Scissors

Paper Trimmer

Instructions:

1. Remove all of the clear bins from the caddy.

2. Pour out some paint on a paper plate. Wet the sponge and squeeze out all of the moisture. Use a pouncing motion to apply paint to the sponge and repeat that motion as you apply the paint to the caddy. After applying a coat of paint to the caddy, apply a second coat where needed. ** If you want a quicker way to do this......a metallic spray paint made for plastic will work great!


3. The caddy should look about like this when you are finished painting.


4. Stars: Cut 1", 3/4" and 1/2" stars from the vinyl using the die-cut machine. Start with about 20 of each size. Peel off the release paper of one star and adhere to one bin. Repeat; randomly placing the stars until you are happy with the way the bins look. 

5. Cut 6 vinyl rectangles at 2" x 2-1/2" using the paper trimmer. Round off the corners with the scissors. Remove the release paper from one rectangle, position and adhere to one of the indention's on the top of a bin. Smooth out all of the air bubbles. If you get a stubborn air bubble; use a pin to release any trapped air. Smooth. Repeat and finish the other indentations. Below is a photo of how they should look when you are finished.


Below are a couple more photos of how my caddy looks now. I love it and I am looking forward to finishing my snowman ornaments. I will be adding some hangers and embellishments to make them look cozy and ready for the tree.


Thank you for stopping by the blog today. I hope you got some inspiration here today and have a wonderful Christmas season!

Cheers!

Marilyn

Friday, December 8, 2017

Custom Christmas Frame

Hello, Nadine here today! Deflecto Craft Frames are super easy to decorate them however you like. I made a DIY Christmas Frame just by adding some paint around the edges.


I used the Deflecto 8" x 10" clear craft frame and add a frosty snow look around the outside edges and corners by bouncing on some DecoArt Snow White Acrylic Paint with a stipple brush.


Once the white paint was dry, I then repeated the process with the stipple brush with some DecoArt Glamour Dust Ice Crystal Paint.


After all the paint is dry add your favorite holiday photo and wrap a ribbon around the frame and tie into a bow, I used a 3/8" Red Sheer Ribbon with Green Metallic Dots from The Ribbon Place


Add a pretty flower (to see how I made the flower, click HERE) over the bow and enjoy. :)


Thank you so much for visiting and happy crafting!

Tuesday, December 5, 2017

Perfect Gift Guide - Organize and Wrap In Style!

Hi Everyone! Alexandra here from Hedgehog Hollow again. I can't believe it's December already, can you? Today I am here to show you a gift I made for our eldest daughter, she's at an age where make-up has become a thing; so I want to give her some to top up her collection plus a way for her to organize it in style! I also have some other ideas for you of how to use the Delfecto Stack and Go Caddy. First of all let's look at the problem (this is my make-up and I totally want one too and so does our Nanny!)...


Now look at the after (maybe Maddi won't get this for Christmas?!)


Doesn't it look so easy to use and organized? Let me show you some great touches I added; first of all the brush storage...


I added brushes on the side using my new Cricut Maker machine and some Pink Holographic Vinyl (all listed at the bottom of the post in my supply list). It's actually labeled as a marker holder but I added my make-up brushes, eyeliner, mascara, my big hair clips for when I'm blow drying or doing foundation plus my favorite comb. You could also add your brush, lip liner, lip gloss and more, they are stretchy silicone squares that are so practical and have so many options. 

I also added the same holographic details on all the caddies...


Don't you love the way that holographic vinyl catches the light? I also used some pink blush metallic vinyl to the tops that again I cut with the Cricut Maker, the font I used is called lipstick...


Each of the caddies has a great lid that has a nice solid click to close and it's very secure so Tilly (our two year old) won't be able to open it and make a mess!


A great gift I'm sure you'll agree, I'm sure I will be making another of these for me and our Nanny, plus maybe a few friends too! The great thing is how you can customize the caddy, there the large three slot caddy, the two and the single which I replaced with the marker storage. You can buy each element individually so you could have all markers for craft or other storage, all singles or a double and a single on each side, the possibilities are endless! I also noticed my nail polish fitted in this great, maybe you could do a manicure one for someone who loves their polish; the customization of these really is never ending!

I also wanted to share some other ideas with you as we have a few of these in other areas of the house too; my husband has a caddy in his photography room for all his cables...


Tilly also has one for her craft supplies and crayons...


So once you have a few (or just one) you can add this wheeled accessory...


And clip them together to form a great stacked wheel along caddy! 


Thanks so much for joining me for my gift guide, I hope I have given you some ideas for presents! Have a very Happy Holiday Season and New Year. I will see you again in 2018!

Happy Stamping!

Alexandra

Related Posts Plugin for WordPress, Blogger...